Flight Departures
In this tutorial, we'll build a digital signage app that shows flight departures at an airport. We'll use some fake flight data, but build a full stack app with a frontend that loads data from the backend in a realistic way using REST APIs. It will be fully multi-lingual, with support for ten languages including non-Roman and right-to-left text. And we'll add in some beautiful graphics and cool CSS animations that take advantage of the GPU power of Senza.
Video tutorial
Server
We'll use Node.js and Express to build the backend server, which implement REST APIs as well as acting as a web server to serve the client resources. The APIs we'll build include:
/airports— a list of airports/airlines— a list of airlines/schedule— data for displaying the flight information in the table
Here's some boilerplate to get us started with server.js:
const express = require("express");
const errorHandler = require('errorhandler');
const port = 8080;
const config = require("./config.json");

const app = express();

app.use(express.static(__dirname + "/public"));
app.use(express.urlencoded({ extended: true }));
app.use(express.json());
app.use(errorHandler({dumpExceptions: true, showStack: true}));

const server = app.listen(port, () => console.log("Flights running on port " + port));
In the interest of brevity, we will avoid including the implementation of helper methods whose implementations are relatively obvious. See the full source code in server.js.
Airlines and Airports
We'll load some static data from airlines.json and airports.json, and define some REST APIs to serve the data:
const airlines = require("./airlines.json").airlines;
const airports = require("./airports.json").airports;

app.get("/airlines", async (req, res) => {
    res.status(200).json(airlines);
});

app.get("/airports", async (req, res) => {
    res.status(200).json(airports);
});
Airlines are pretty simple and are returned in this format, including the two-letter airline code and its home country.
{
    "airlines": [
        {
            "code": "AC",
            "country": "CA",
            "name": "Air Canada"
        },
        {
            "code": "CA",
            "country": "CN",
            "name": "Air China"
        },
        {
            "code": "AF",
            "country": "FR",
            "name": "Air France"
        }
    ]
}
The airports have a little more information, including the three letter airport code, country, the name localized in ten languages. In certain cases the native name and its language code are included as well, for example Bangalore is ಬೆಂಗಳೂರು.
    {
      "code": "BLR",
      "country": "IN",
      "names": {
        "en": "Bangalore",
        "es": "Bangalore",
        "fr": "Bangalore",
        "ru": "Бангалор",
        "zh": "班加罗尔",
        "jp": "バンガロール",
        "kr": "방갈로르",
        "hi": "बैंगलोर",
        "he": "בנגלור",
        "ar": "بنغالور"
      },
      "lang": "hi",
      "native": "ಬೆಂಗಳೂರು"
    },
(Clever readers will notice that ಬೆಂಗಳೂರು is written in Kannada, not Hindi. We'll use hi for all Indian languages; the purpose here is just to make sure that we load the correct font.)
We'll also index the data by country and airport code:
let airlinesByCountry = groupByCountry(airlines);
let airportsByCountry = groupByCountry(airports);
let airportIndex = {}
airports.forEach(airport => airportIndex[airport.code] = airport);
Schedule
We'll generate some fake schedule information that looks more or less realistic.
- A random time in the next two days, which is converted to an ISO string when returned by the API
- An airport, picked randomly from the list
- An airline, picked from the airlines that are based in the airport's country if possible, otherwise a random one
- The flight number, a random number between 100 and 5000
- The gate, a random letter from A-G plus a random number from 1-50
- A delay; 10% of flights will be delayed up to three hours
- One out of 30 flights will be marked as cancelled
Here's the code to generate the schedule. The app is designed to run for a long period of time, so every 24 hours it will refresh the schedule with a new batch of 500 fake flights.
let schedule = [];
function createSchedule() {
  schedule = [];
  let now = new Date();
  for (let i = 0; i < config.numFlights; i++) {
    let airport = randomObject(airports);
    let airline = randomObject(airlinesByCountry[airport.country] || airlines);
    let flight = {
      "time": randomTime(2),
      "airline": airline.code,
      "flight": zeroPad(randomNumber(100, 5000), 4),
      "airport": airport.code,
      "gate": randomObject(config.terminals) + zeroPad(randomNumber(1, config.maxGate), 2),
      "delay": randomNumber(1,config.delayChance) == 1 ? randomNumber(1,config.maxDelay) : 0,
      "cancelled": randomNumber(1,config.cancelledChance) == 1
    };
    schedule.push(flight);
  }
  schedule.sort((a,b) => a.time - b.time);
}
createSchedule();
setInterval(createSchedule, config.refreshScheduleHours * 3600000);
Twice a minute we will calcualte how many mintutes from now each flight is leaving and update the remarks. For example, if the flight is leaving between 30 and 60 minutes from now it will display as "boarding".
function updateRemarks() {
  let now = new Date();
  schedule.forEach(flight => {
    flight.minutes = Math.floor((flight.time.getTime() - now.getTime()) / 60000) + flight.delay;
    let newRemarks = flight.cancelled ? "cancelled" : remarks(flight.minutes, flight.delay);
    flight.remarks = newRemarks;
  });
}
updateRemarks();
setInterval(updateRemarks, config.updateRemarksSeconds * 1000);

function remarks(minutes, delay) {
  if (minutes < config.filterStart) {
    return "done";
  } else if (minutes < 0) {
    return "departed";
  } else if (minutes < 20) {
    return "closed";
  } else if (minutes < 30) {
    return "finalcall";
  } else if (minutes < 60) {
    return "boarding";
  } else if (minutes < 90) {
    return "gogate";
  } else if (delay) {
    return "delayed";
  } else if (minutes < 180) {
    return "checkin";
  } else {
    return "ontime";
  }
}
The /schedule endpoint will return up to 50 flights, starting with ones that departed up to half an hour ago.
app.get("/schedule", async (req, res) => {
  let filtered = schedule.filter(flight => flight.minutes > config.filterStart);
  if (filtered.length > config.maxResults) filtered = filtered.slice(0, config.maxResults);
  res.status(200).json(filtered);
});
Here's an example response from the API, which includes both the data that is generated every 24 hours as well as the minutes and remarks that are updated every 30 seconds:
[
  {
    "time": "2025-05-14T17:40:00.000Z",
    "airline": "QF",
    "flight": "3466",
    "airport": "SYD",
    "gate": "B50",
    "delay": 149,
    "cancelled": false,
    "minutes": 173,
    "remarks": "delayed"
  },
  {
    "time": "2025-05-14T17:40:00.000Z",
    "airline": "TP",
    "flight": "2886",
    "airport": "LIS",
    "gate": "E43",
    "delay": 0,
    "cancelled": false,
    "minutes": 24,
    "remarks": "finalcall"
  },
  {
    "time": "2025-05-14T17:50:00.000Z",
    "airline": "TK",
    "flight": "3675",
    "airport": "VCE",
    "gate": "C45",
    "delay": 0,
    "cancelled": false,
    "minutes": 34,
    "remarks": "boarding"
  }
]
Client
We'll generate all the content for our app dynamically, so the index.html file for our app contains just a single div element.
<!DOCTYPE html>
<html>
<head>
  <title>Flights</title>
	<link rel="stylesheet" href="styles.css">
</head>
<body>
<div id="main">
</div>
</body>
<script type="text/javascript" src="strings.js"></script>
<script type="text/javascript" src="client.js"></script>
</html>
You'll notice that the app doesn't import the Senza SDK at all, since it doesn't need to integrate with any interfaces specific to Senza.
We'll include a strings.js file to help the app dislpay text in ten languages:
let strings = {
  "departures": {
    "en": "Departures",
    "es": "Salidas",
    "fr": "Départs",
    "ru": "Отправления",
    "zh": "出港",
    "jp": "出発",
    "kr": "출발",
    "hi": "प्रस्थान",
    "he": "יציאות",
    "ar": "المغادرةتحقق"
  },
  "time": {
    "en": "Time",
    "es": "Tiempo",
    "fr": "Heure",
    "ru": "Время",
    "zh": "时间",
    "jp": "時間",
    "kr": "시간",
    "hi": "समय",
    "he": "זמן",
    "ar": "وقت"
  }
};
All the other code will be in the client.js file. Here's a few state variables that we'll use to store the available and selected languages, which page we're on, etc.
const langs = ["en", "fr", "es", "ru", "jp", "kr", "zh", "hi", "he", "ar"];
let langIndex = 0;
let lang = "en";

let page = 0;
let pageSize = 10;
let numPages = 1;
When the app starts up, we'll make some API calls to load the static airline and airport data. Then we'll load the first batch of schedule data, and set a timer to refresh it once per minute. As mentioned above, the app will continue to display upcoming flights as well as those that departed up to half an hour ago.
let airlines = [];
let airports = [];
let airportIndex = {};
let schedule = [];
window.addEventListener("load", async () => {
await loadData();
await loadSchedule();
setInterval(loadSchedule, 60000);
animate(createTable());
setInterval(changePage, 7000);
});
async function loadData() {
airlines = await (await fetch("/airlines")).json();
airports = await (await fetch("/airports")).json();
airports.forEach(airport => airportIndex[airport.code] = airport);
}
async function loadSchedule() {
schedule = await (await fetch("/schedule")).json();
schedule.forEach(flight => flight.airport = airportIndex[flight.airport]);
numPages = schedule.length / pageSize;
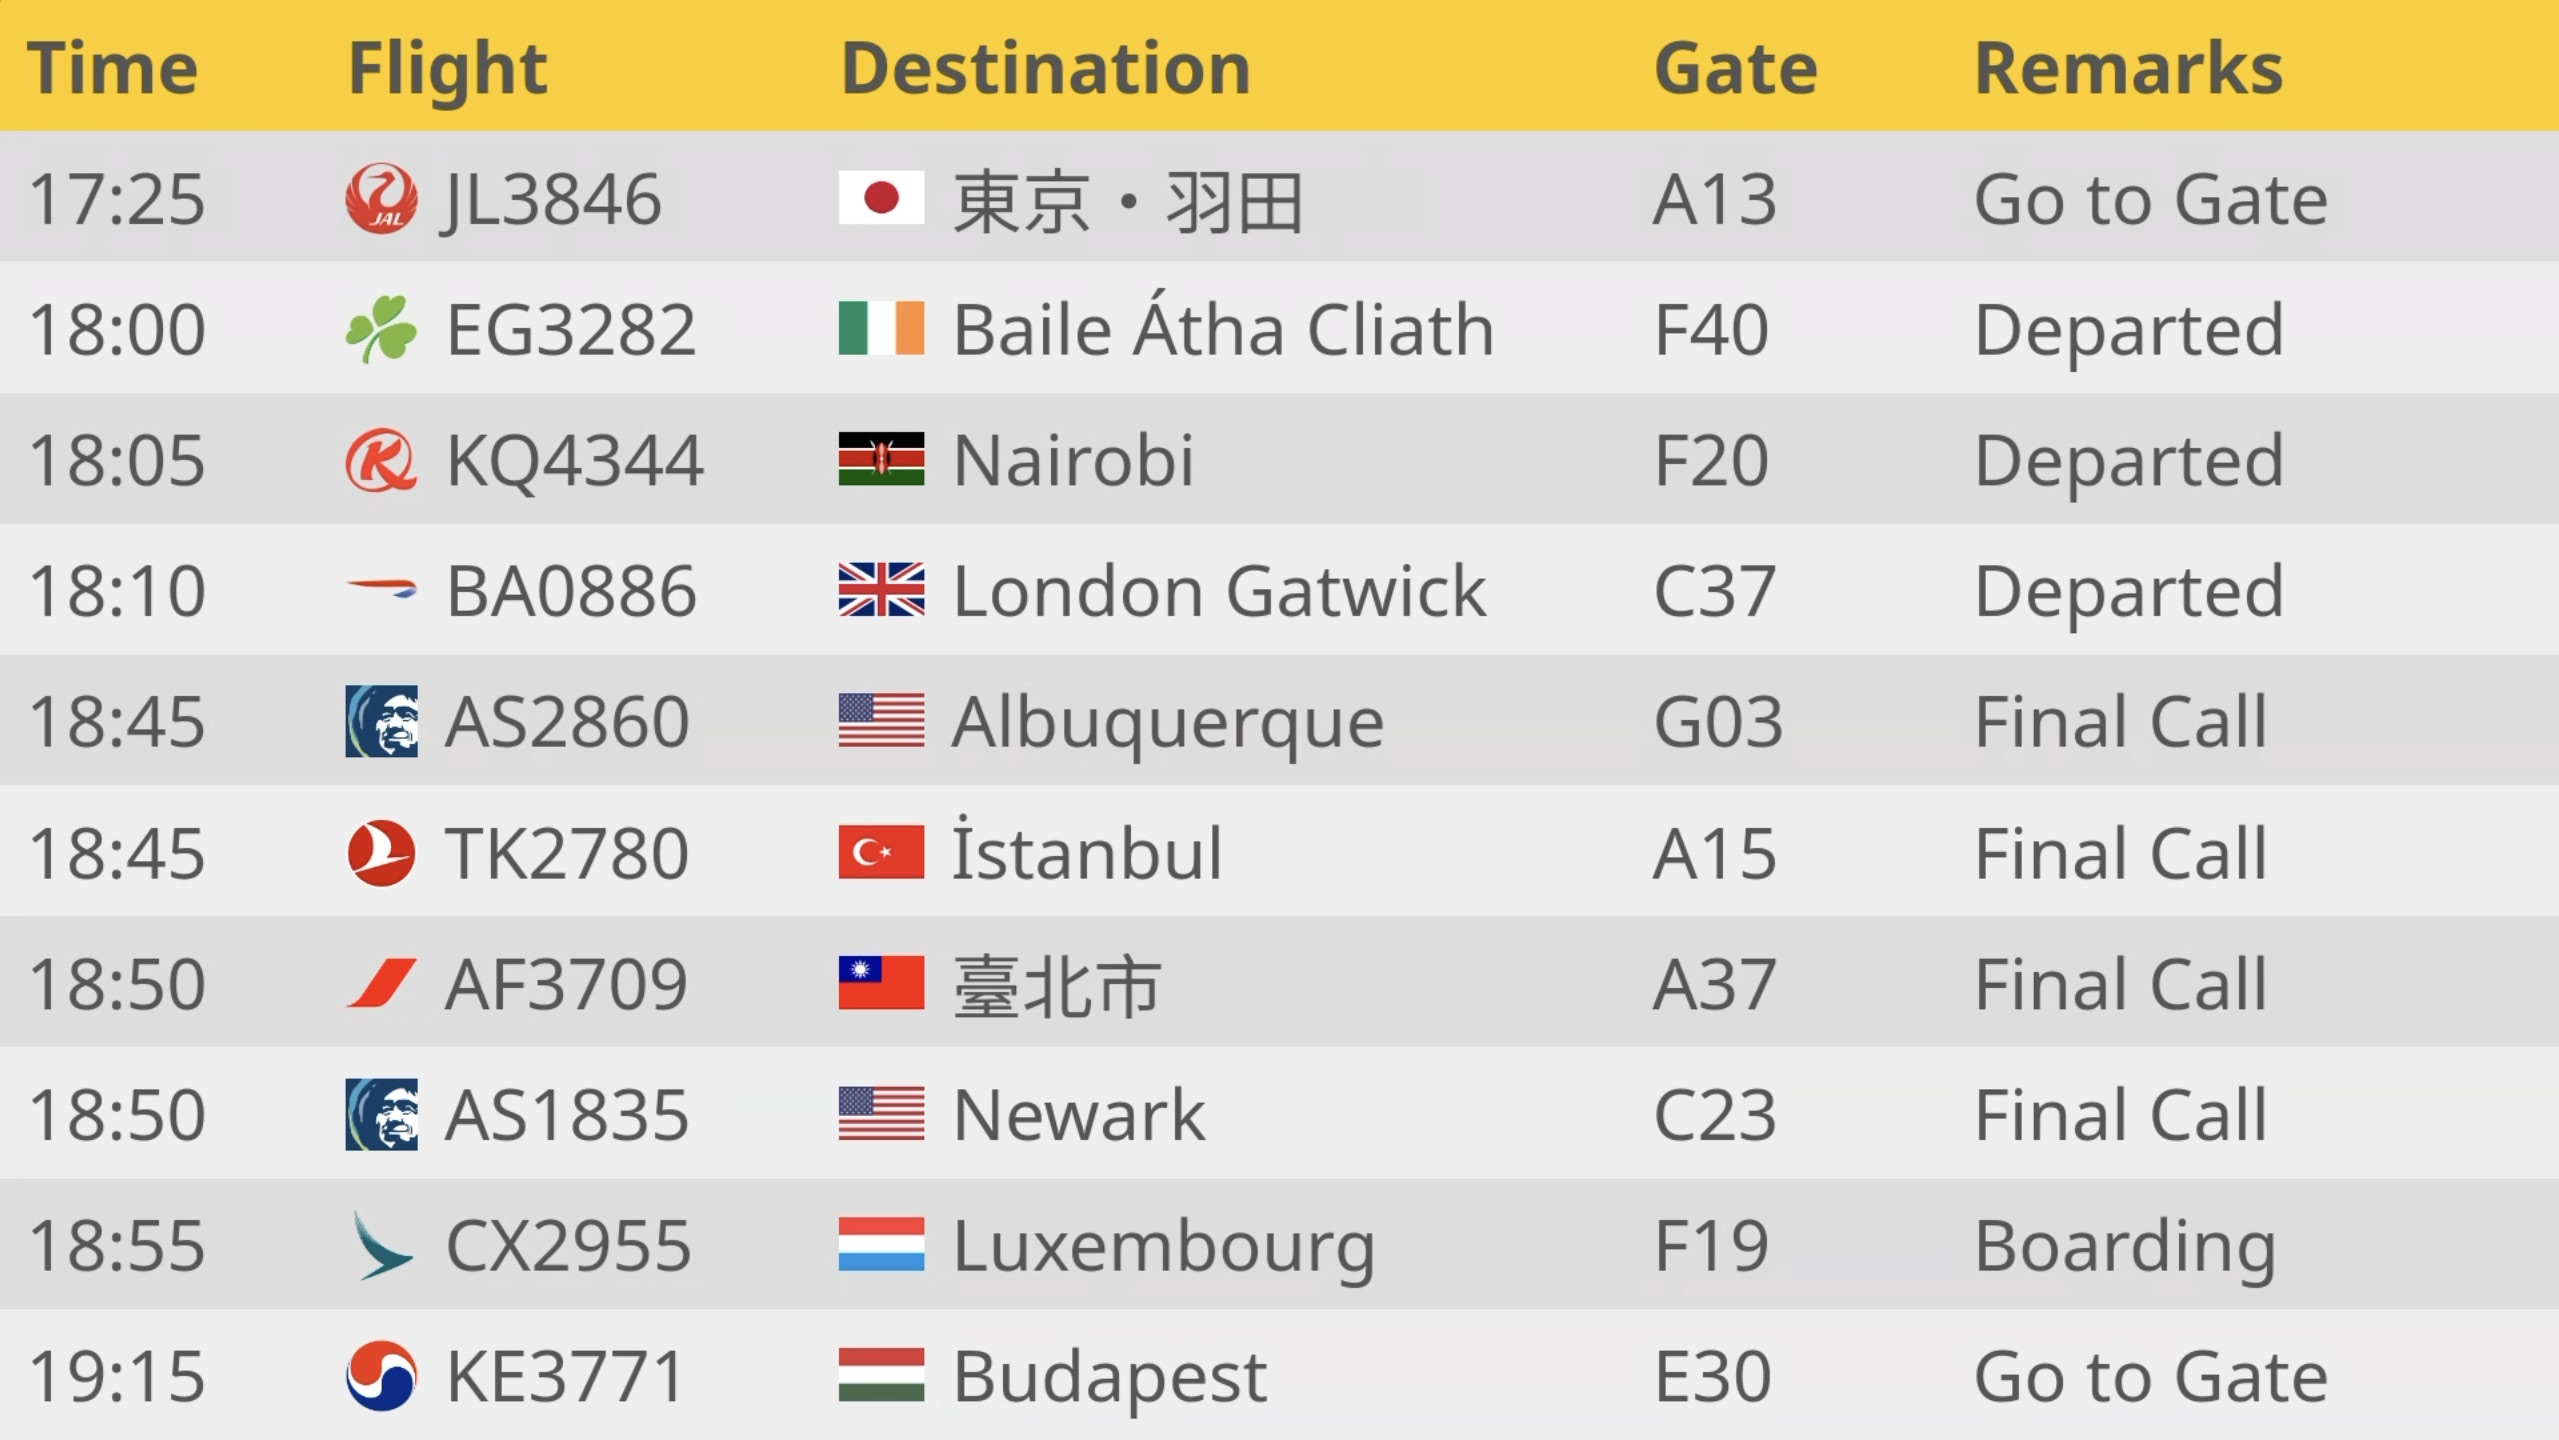
}Table
Here's some code to dynamically generate the table and the header row. We'll call it whenever we want to refresh the page.
The table headers are localized in the current language. When we're displaying content in Hebrew or Arabic, we'll set the table to flow from right to left.
We'll also paginate the data into five pages of ten flights each. Each time we display the table, we'll grab a slice of the data for the current page.
function createTable(native) {
  let newTable = document.createElement("table");
  newTable.classList.add("table");
  newTable.dir = langIndex < 8 ? "ltr" : "rtl";
  createHeader(newTable);
  let someFlights = schedule.slice(page * pageSize, (page + 1) * pageSize);
  someFlights.forEach(flight => createRow(newTable, flight, native));
  preloadImages(someFlights // preload the featured images for this page
    .filter(flight => flight.airport.featured)
    .map(flight => `wallpaper/${flight.airport.code}.jpg`));
  return newTable;
}

function createHeader(table) {
  const headerRow = table.insertRow();
  const labels = ["time", "flight", "destination", "gate", "remarks"];
  labels.forEach(label => {
    const cell = headerRow.insertCell();
    cell.classList.add(label, lang);
    cell.appendChild(document.createTextNode(strings[label][lang]));
  });
}
Featured airports include wallpaper that we'll use as part of the presentation. We'll preload the images for these destionations so that there is no loading delay when displaying them.
Rows
Then we'll create a table row for each flight on the current page. We'll start with the data from the schedule API, and create an array of augmented data for display in each cell, including localized and human readable strings, images and style information.
- the formatted time
- the airline, along with its logo
- the airport, along with the flag of its country
- the gate
- the remarks, including the number of minutes delayed
The native parameter determines if we should try to load the airport's native name, i.e. ಬೆಂಗಳೂರು for Bangalore. We'll only do this if a native name is available, and the current language is set to English or Russian. If the app is set to any other language, we'll display airport names consistently in that language.
function flightData(flight, native) {
  let country = flight.airport.country.toLowerCase();
  native = native && (lang == "en" || lang == "ru") && flight.airport.native;
  return [{key: "time", text: formatTime(new Date(flight.time))},
    {key: "flight", text: flight.airline + flight.flight,
      icon: `logos/${flight.airline}.png`,
      style: flight.airline},
    {key: "destination",
      text: native ? flight.airport.native : flight.airport.names[lang],
      icon: `https://flagpedia.net/data/flags/w160/${country}.webp`,
      style: country},
    {key: "gate", text: flight.gate},
    {key: "remarks", text: strings[flight.remarks][lang] + delayTime(flight)}];
}

function createRow(table, flight, native) {
  const row = table.insertRow();
  flightData(flight, native).forEach(data => {
    const cell = row.insertCell();
    cell.classList.add(data.key, table.dir);
    if (!["time", "flight", "gate"].includes(data.key)) cell.classList.add(lang);
    if (native && data.key == "destination" && flight.airport.lang) cell.classList.add(flight.airport.lang);
    if (data.icon) {
      const img = document.createElement("img");
      img.src = data.icon;
      img.classList.add(data.style)
      cell.appendChild(img);
    }
    cell.appendChild(document.createTextNode(data.text));
  });
}
You'll find the airline logos in the logos folder.
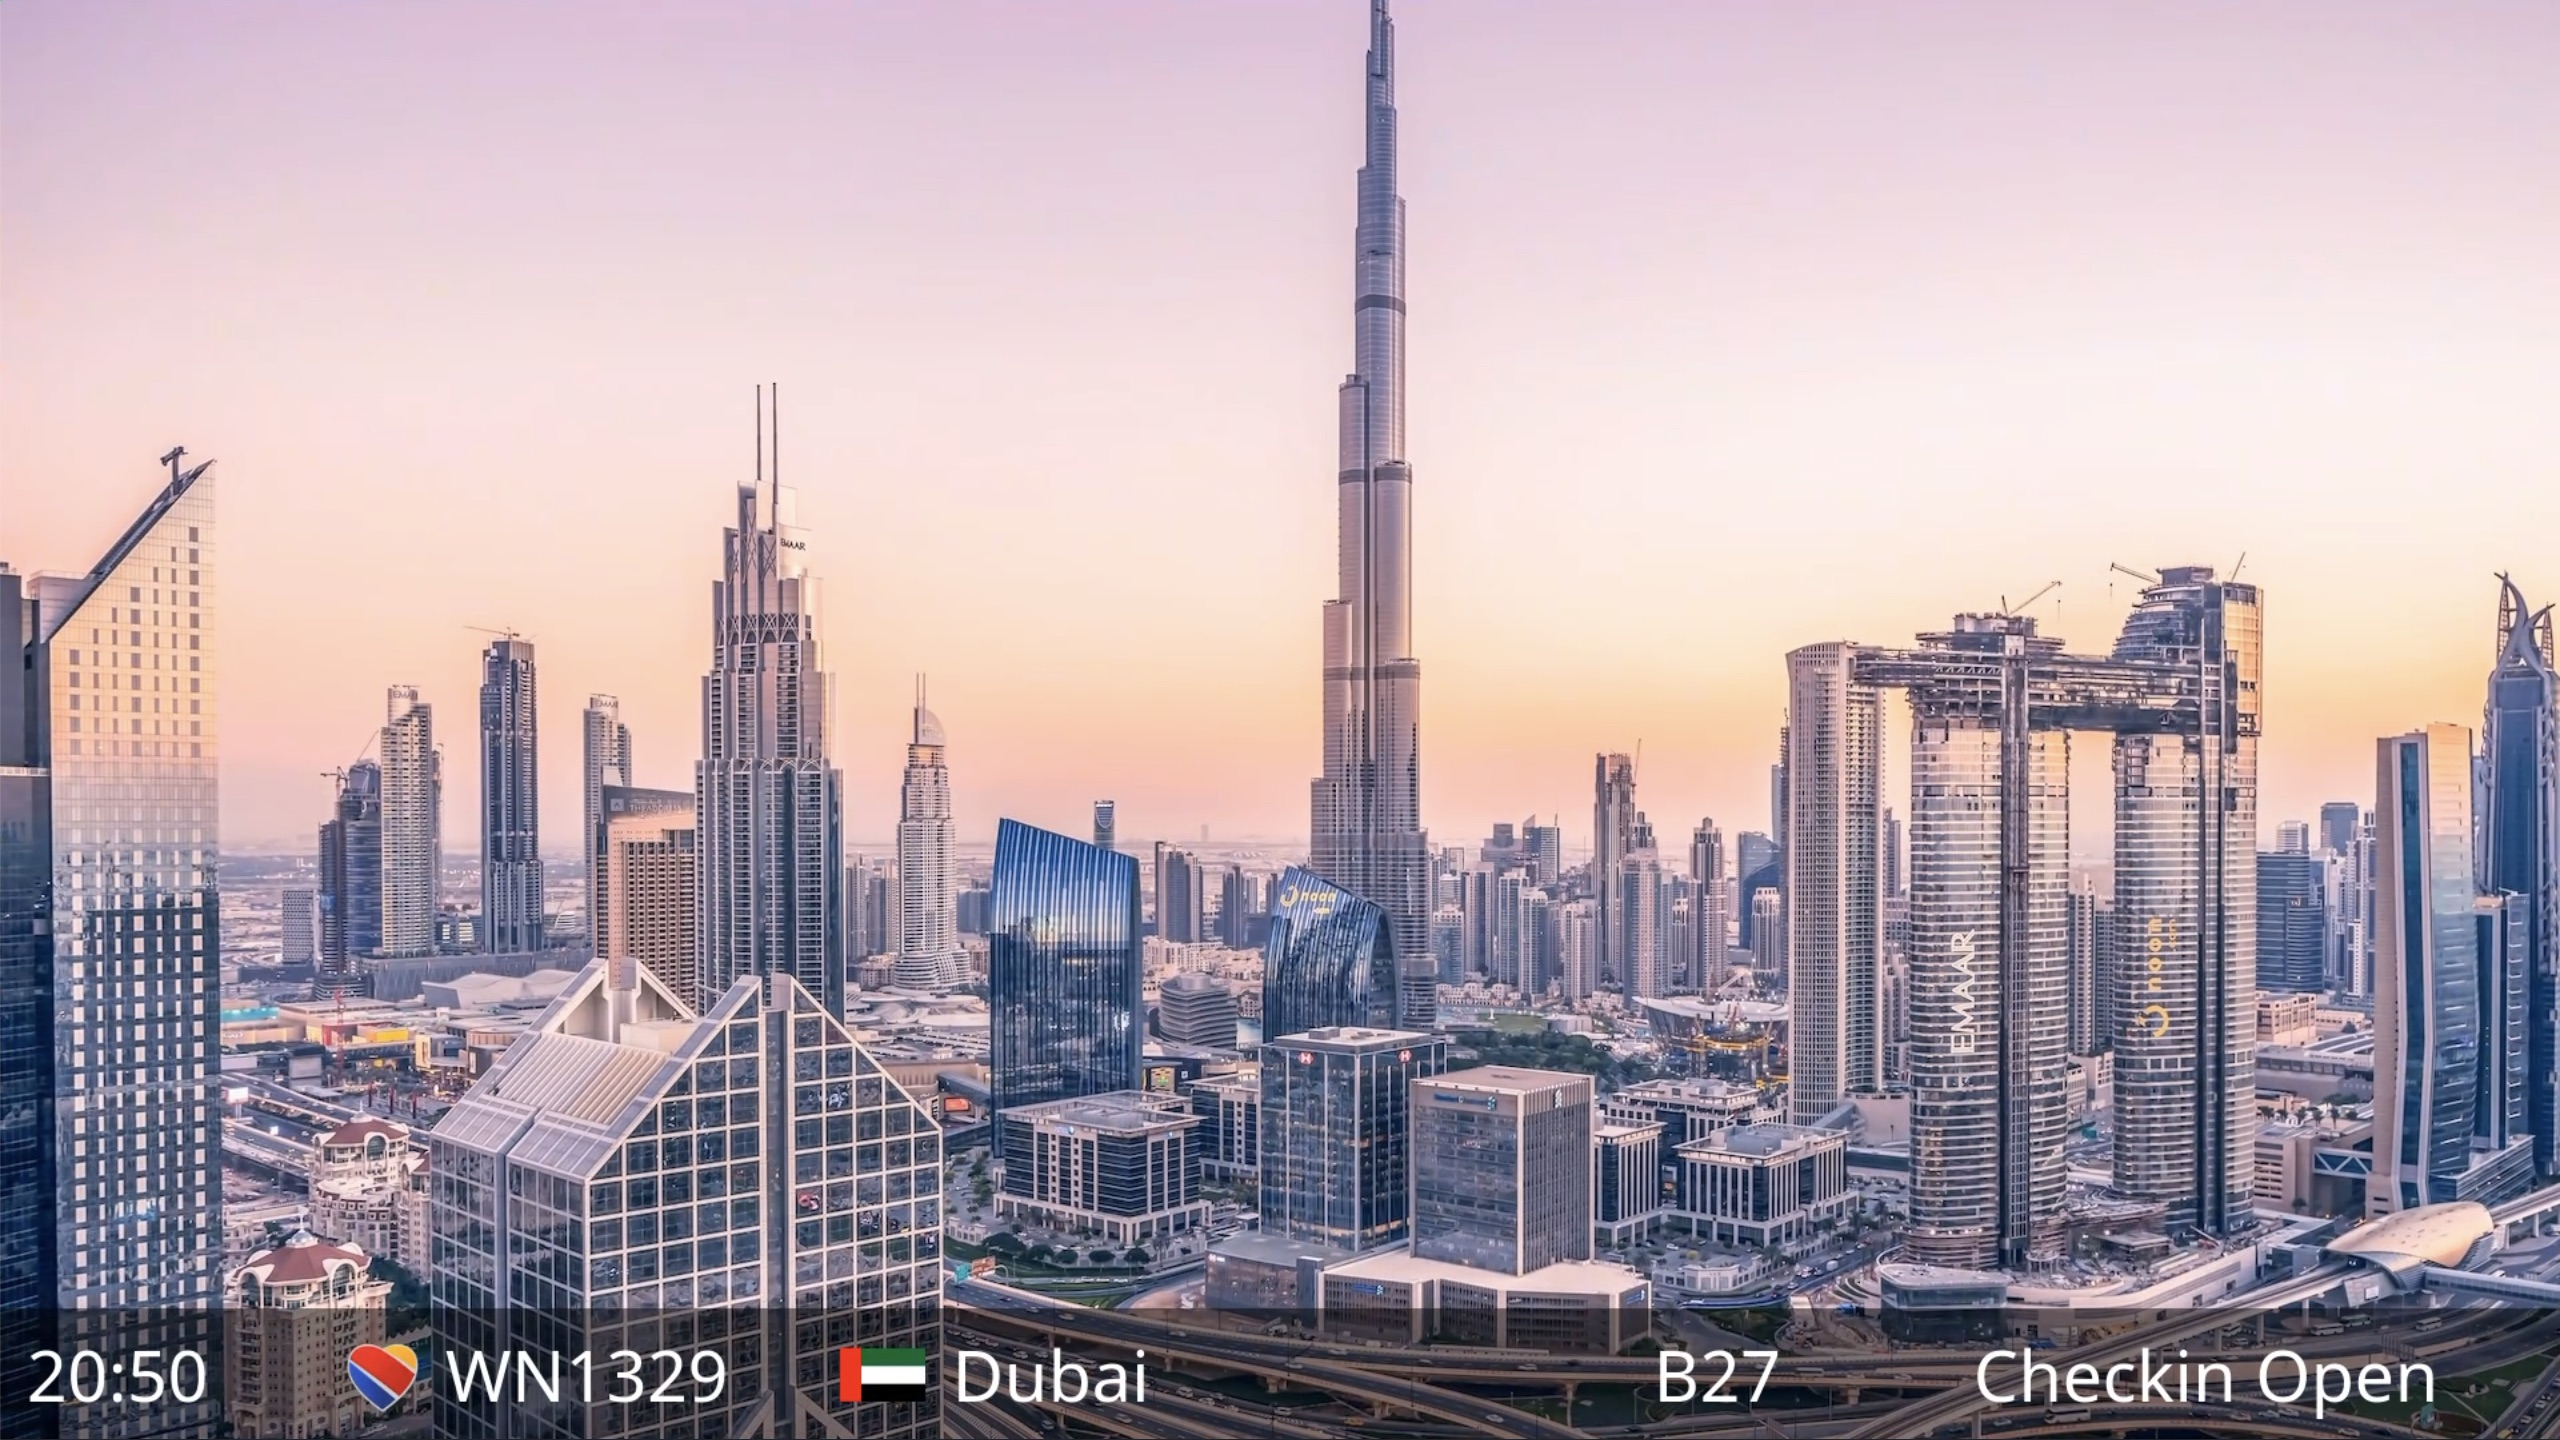
Wallpaper
We'll create the ability to display a fullscreen wallpaper image, showing highlights from one of the featured destinations on the current page. The wallpaper screen will include a table with a single row with information about the flight to that airport.
let wallpaperFlight = null;
function createWallpaper(flight) {
  wallpaperFlight = flight || featuredFlight();
  let airport = wallpaperFlight.airport;
  let page = document.createElement("div");
  page.classList.add("wallpaper");
  let wallpaper = document.createElement("img");
  wallpaper.src = `wallpaper/${airport.code}.jpg`;
  wallpaper.classList.add("wallpaper");
  page.appendChild(wallpaper);
  let native = false;

  // if the airport has a native name but we don't support the native language,
  // then use the native name and switch to English for the remarks.
  if (airport.native && !airport.lang && lang != "en") {
    native = true;
    setLangIndex(0);
  }

  let miniTable = document.createElement("table");
  miniTable.classList.add("mini-table");
  miniTable.dir = langIndex < 8 ? "ltr" : "rtl";
  createRow(miniTable, wallpaperFlight, native);
  page.appendChild(miniTable);

  return page;
}

// returns a flight to a featured destination from the current page, otherwise from any page
function featuredFlight() {
  let someFlights = schedule.slice(page * pageSize, (page + 1) * pageSize);
  let featuredFlights = someFlights.filter(flight => flight.airport.featured);
  if (featuredFlights.length == 0) featuredFlights = schedule.filter(flight => flight.airport.featured);
  return randomObject(featuredFlights);
}
You'll find the airport images in the wallpaper folder.
Pages
Every seven seconds the app will cycle through one of the six displays:
- The departures in English
- The departures with airports in their native language
- Wallpaper in a random language
- Wallpaper in English
- Departures in a random language
- One more time in English
For step 3 the logic is a little more complex. It will attempt to show the whole internface in the airport's local language if it is one of the ten supported by the app other than English. If the airport has a non-English native name it will show that with the interface in English. Otherwise it will just show everything in a random language.
Once it has looped through these, it will move to the next page and start again. After it gets to the last page, it will return to the first page.
Here's the loop that implements that business logic:
let tick = 0;
function changePage() {
  tick++;
  switch (tick % 6) {
  case 0:
    setLangIndex(0);
    nextPage();
    break;
  case 1:
    animate(createTable(true));
    break;
  case 2:
    let flight = featuredFlight();
    setLangIndex(flight?.airport?.lang ? langs.indexOf(flight.airport.lang) : randomNumber(1,9));
    animate(createWallpaper(flight), 1.0, "dissolve-in");
    break;
  case 3:
    setLangIndex(0);
    animate(createWallpaper(wallpaperFlight));
    break;
  case 4:
    setLangIndex(randomNumber(1,9));
    animate(createTable(), 1.0, "dissolve", "out");
    break;
  case 5:
    setLangIndex(0);
    animate(createTable());
    break;
  }
}
Animations
We'll use a few different types of CSS animations:
- Dissolves from one language to another
- Sliding to the left from one page to the next one
- Sliding to the right when going back to the first page
- Zooming into the frame when showing a wallpaper
- Zooming out of the frame when hiding a wallpaper
Each time we change pages, we'll add the new page on top of the old one, perform the requested animation, and then remove the old page.
let oldPage = null;
function animate(newPage, duration = 1.0, newName = "dissolve", oldName = null) {
  main.appendChild(newPage);
  if (oldPage) {
    newPage.style.zIndex = 2;
    oldPage.style.zIndex = 1;
    newPage.style.animationName = newName;
    if (oldName) oldPage.style.animationName = oldName;
    newPage.style.animationDuration = duration + "s";
    if (oldName) oldPage.style.animationDuration = duration + "s";
  }

  setTimeout(() => {
    if (oldPage) main.removeChild(oldPage);
    oldPage = newPage;
  }, duration * 1000);
}
In styles.css you can find the definitions of the various animations that are applied.
- Dissolve changes the opacity from zero to one
- Dissolve-in increases the scale from 0.7 to one, unblurs from 4px to zero, and changes the opacity from zero to one
- Out is applied to images that are fading out as a new page is displayed on top, so it increases the scale from one to 0.5 while blurring from zero to 8px.
- Slide previous and next moves the new page in from the right or the left
- Similarly, there are transitions to slide the old page out of the way.
@keyframes dissolve {
  0% { opacity: 0.0; }
  100% { opacity: 1.0; }
}

@keyframes dissolve-in {
  0% {
    transform: scale(0.7);
    filter: blur(4px);
    opacity: 0.0;
  }
  100% {
    transform: scale(1.0);
    filter: blur(0px);
    opacity: 1.0;
  }
}

@keyframes out {
  0% {
    transform: scale(1.0);
    filter: blur(0px);
  }
  100% {
    transform: scale(1.5);
    filter: blur(8px);
  }
}

@keyframes slide-prev {
  0% { left: -1920px; }
  100% { left: 0px; }
}

@keyframes slide-next {
  0% { left: 1920px; }
  100% { left: 0px; }
}

@keyframes slide-prev-old {
  0% { left: 0px; }
  100% { left: 1920px; }
}

@keyframes slide-next-old {
  0% { left: 0px; }
  100% { left: -1920px; }
}
Each animation lasts for one second. Because the page changes every seven seconds, that'll be one second of motion and six seconds of nothing changing at all. Since Senza uses variable frame rate video, if nothing is changing then it won't send any frames at all, and the device will continue showing the last frame that was received until a new one comes down the pipe.
Some animations are dramatic while others are subtle. When Istanbul switches to its native name, you'll see a little dot appear over the first letter in "İstanbul".
Remote Control
Normally this signage application is designed to run in a fully automated way, without any user interaction. For development purposes, we'll add some features that let you use the remote control to change what is displayed:
- OK to show a random wallpaper
- left and right to cycle through pages
- up and down to change language
We'll use the standard event handler to listen for button pushes and change the display as needed:
document.addEventListener("keydown", async function(event) {
	switch (event.key) {
    case "Enter": animate(createWallpaper(), 2.0, "dissolve-in"); break;
    case "Escape": break;
    case "ArrowLeft": prevPage(); break;
    case "ArrowRight": nextPage(); break;
    case "ArrowUp": prevLang(); break;
    case "ArrowDown": nextLang(); break;
		default: return;
	}
	event.preventDefault();
});

function prevLang() {
  setLangIndex((langIndex - 1 + langs.length) % langs.length);
  animate(createTable(), 1.0, "dissolve");
}

function nextLang() {
  setLangIndex((langIndex + 1) % langs.length);
  animate(createTable(), 1.0, "dissolve");
}

function setLangIndex(value) {
  langIndex = value;
  lang = langs[langIndex];
}

function prevPage() {
  page = (page - 1 + numPages) % numPages;
  animate(createTable(), 1.5, `slide-prev`, `slide-prev-old`);
}

function nextPage() {
  page = (page + 1) % numPages;
  animate(createTable(), 1.5, `slide-next`, `slide-next-old`);
}
Fonts
Senza runs web apps in a Chromium browser on Linux, where the font support is quite basic. If you'd like to use beautiful fonts and add support for other languages, it's best to bring your own. In this app, we'll load fonts in two ways: linking to some Google fonts, as well as including a local font resource.
In the index.html, you can load some fonts from Google like this. This loads the Noto Sans font, with weights ranging from 400 (normal) to 700 (bold), including Japanese, Korean and Chinese variants.
  <link rel="preconnect" href="https://fonts.googleapis.com">
  <link rel="preconnect" href="https://fonts.gstatic.com" crossorigin>
  <link rel="stylesheet" href="https://fonts.googleapis.com/css2?family=Noto+Sans:[email protected]&family=Noto+Sans+JP:[email protected]&family=Noto+Sans+KR:[email protected]&family=Noto+Sans+SC:[email protected]&display=swap">
In dubai.css, you can see how to load some local fonts. In this case we're loading Dubai, an Arabic font developed by (you guessed it) the city of Dubai to be modern and legible for signage applications.
@font-face {
  font-family: 'Dubai';
  font-weight: 400;
  src: url('DubaiW23-Regular.woff') format('woff');
}

@font-face {
  font-family: 'Dubai';
  font-weight: 700;
  src: url('DubaiW23-Bold.woff') format('woff');
}
In styles.css, we'll apply these fonts to content in different languages like this:
td.jp { font: 40pt "Noto Sans JP"; }
td.kr { font: 40pt "Noto Sans KR"; }
td.zh { font: 40pt "Noto Sans SC"; }
td.ar { font: 40pt "Dubai"; }
Try it out
You can run the server locally like this:
npm install
node server.js
Then you can check that it's running by going to http://localhost:8080 in your own browser. See Using Ngrok for information about testing the app on Senza from your local development environment, and Deploying Node.js Apps to learn how to host your app in the cloud. If you're feeling lazy and just want to see how it looks, you can watch the video at the top of the page.
When you run the app on Senza, you'll see that the animations display smoothly and text in different languages is rendered in the correct fonts. You can keep the app running and maybe you'll be inspired to visit one of the featured destinations!
Updated about 2 months ago