Quick Start
Thanks for participating in the Senza Hackathon! Here's a quick step-by-step guide that you can follow to get up to speed on the Senza platform quickly.
Pre-requisites
Here are some things you probably already have installed, but let's just double check to make sure...
- You'll need Google Chrome to use the Remote Debugger.
- Make sure you have Node.js installed. We'll use it for the Device Gateway, as some of the Sample Apps use it too.
- You'll need a local development environment that can serve web pages.
- With Node.js: run
npx http-serverin the folder you want to serve; it starts a server athttp://localhost:8080. - With Python: run
python3 -m http.serverto start a simple server athttp://localhost:8000.
- With Node.js: run
Using the Simulator
Senza Console
The Senza Console is your entry point for accessing the Simulator and the Debugger.
- We'll send you an invitation to the Senza Console when you sign up for DevPost.
- Look for an email called "Synamedia Cloud Portal Invite Email" in your inbox.
- If you didn't get one, find Sergio in person or on Slack and ask him to invite you.
- Click the "Accept Invitation" button in the email to set up your account.
- Sign in at https://senzadev.net/console.
Simulator
The Device Simulator lets you run web apps on the Senza platform right from the comfort of your web browser—how innovative!
- On the Senza Console home page, click the "Simulator" link next to any of the devices in the Favorite Devices section.
- The Simulator will open in a new tab. Click "Connect". (You don't need to fill anything into the address field.)
Senza App
The Simulator will load the Senza App, the default app for the tenant.
- Explore the Senza App in the Simulator using the on-screen remote.
- You can also use the arrow, return and escape keys on your keyboard to simulate button presses.
Try another app
Try running your own app in the Simulator and see how it works.
- Click "Disconnect".
- Enter your favorite website address starting with
httpsin the address field, and click "Connect". - See how the website works. You can't interact directly with the mouse and keyboard, so if it wasn't designed for TV the interaction may be limited.
Debugger
The Remote Debugger lets you debug an app running on Chrome in the cloud the way you normally would.
- In the Simulator, click the "Debug" button in the toolbar. In the page that opens, click the link for your website. This will open the remote debugger, with a preview of your website and the usual developer tools.
- You can click on the website preview to follow links, scroll the page, and type directly here. This is useful if you need to sign into a website before you've started integrating it.
Sample app
Now let's explore a sample app.
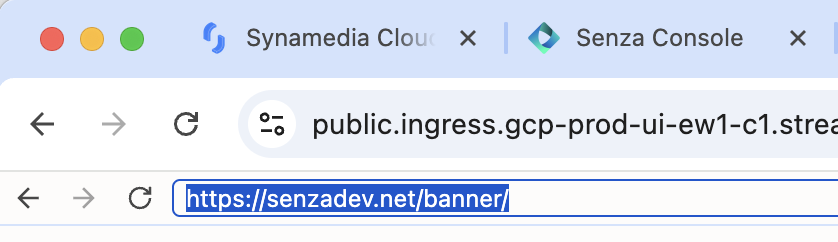
- In the Simulator, click "Disconnect".
- Enter
https://senzadev.net/banner/in the address field, and click connect. - It will load the Reference app, which plays a video about a bunny with a welcome banner on top.
- Use the right arrow to jump forwards 30 seconds, and the left arrow to go back 30 seconds.
- Hit "OK (enter key)" to switch to background mode, or just wait 15 seconds without pressing a button. It will start streaming the video directly from the CDN, and the HTML banner will disappear.
- Press "OK" again to switch back to foreground mode. You'll see the banner reappear.
Using a Cloud Connector
The Cloud Connector is a device that connects to your Wi-Fi network, streams your app's user interface and video content, and outputs it to a TV over HDMI.
Device setup
We'll give you a cloud connector that you can use for development. It's yours to keep, our gift to you!
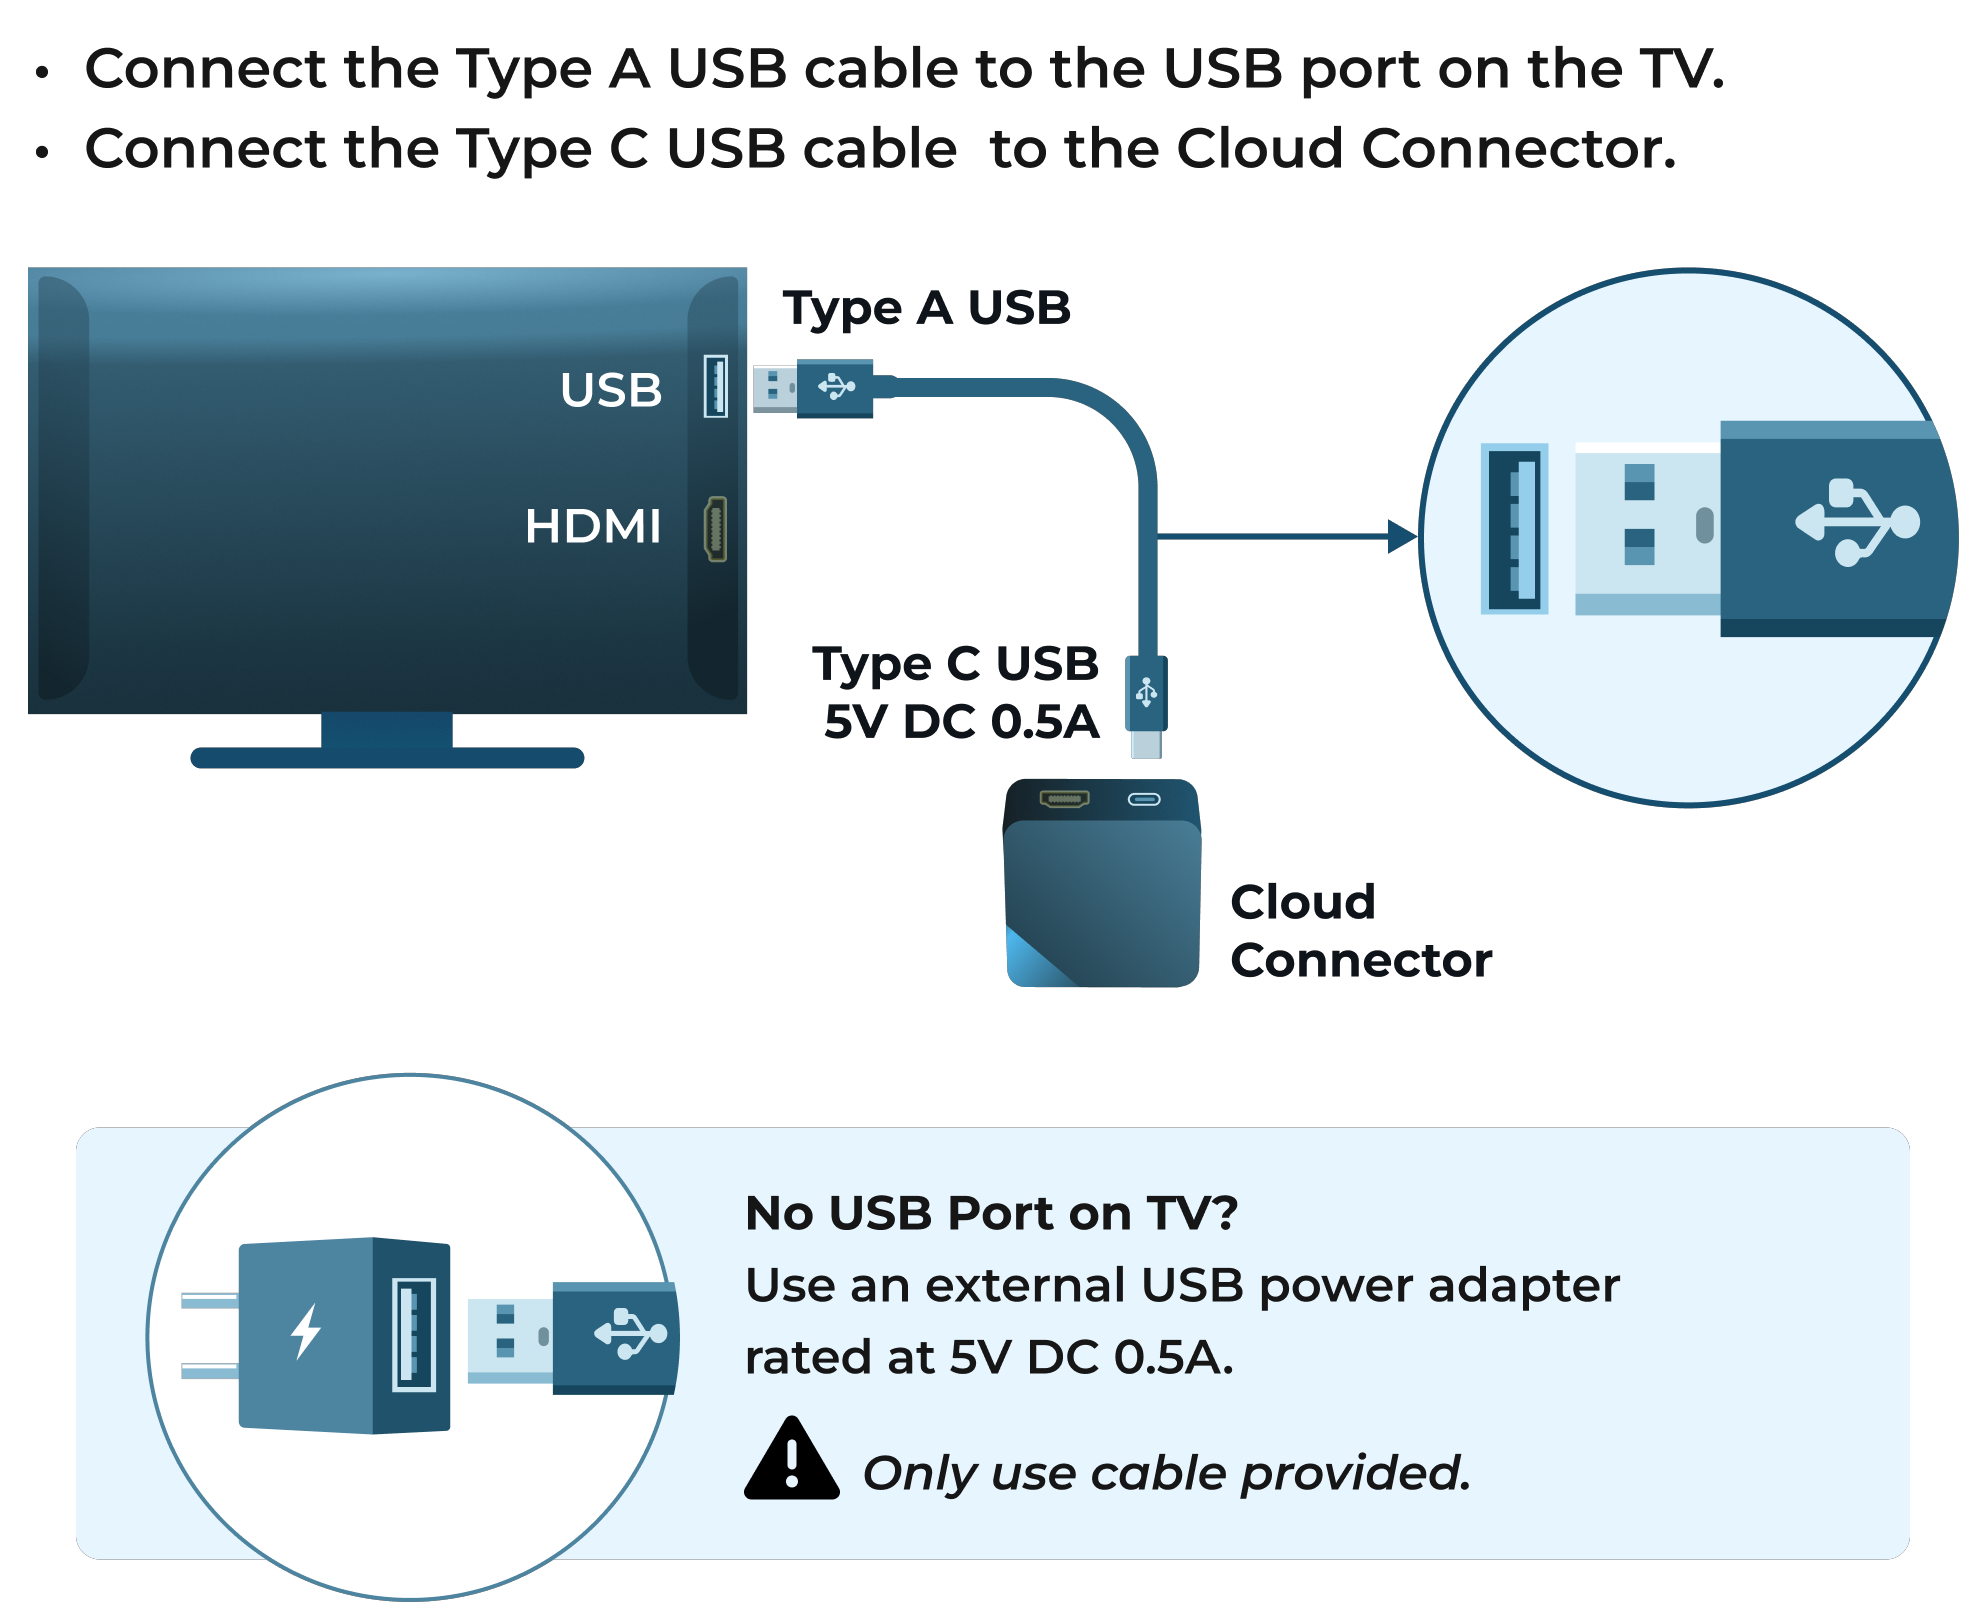
Follow the instructions in the Quick Start Guide included in the box to connect to the Wi-Fi network.
Senza app
Try exploring the Senza App using the remote control to get a sense of how it feels.
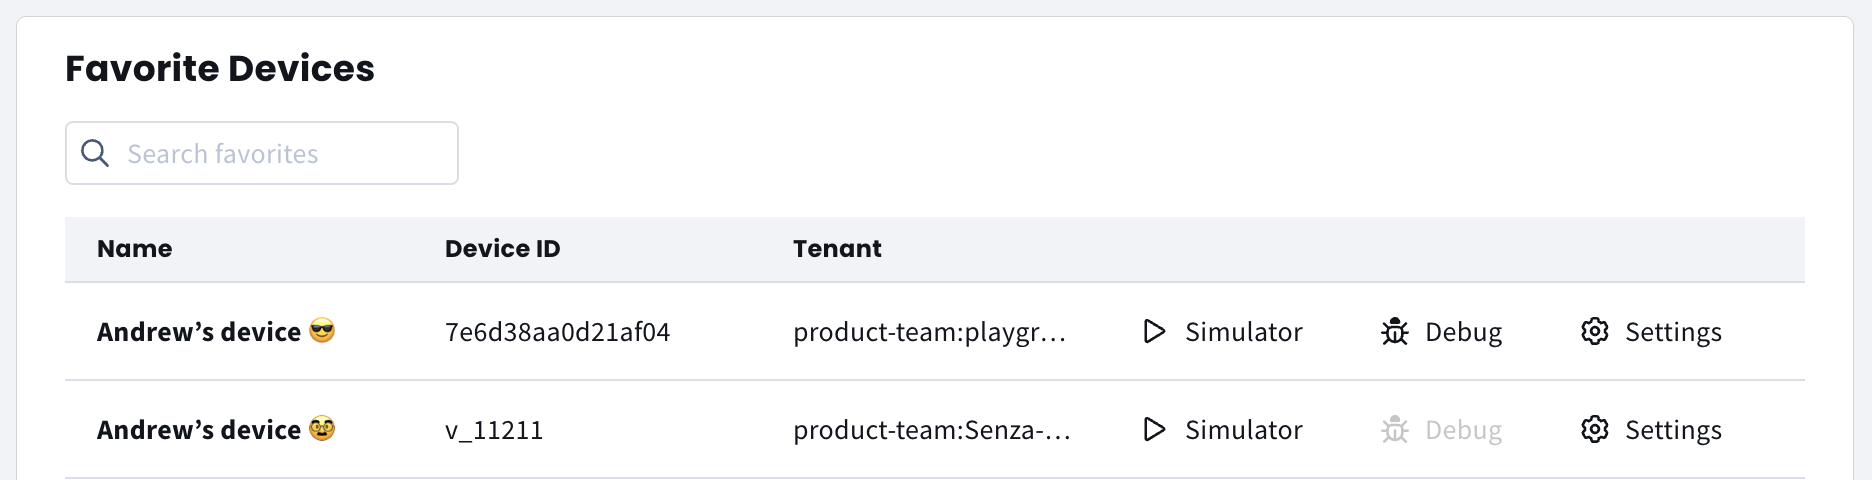
Add to favorites
Let's find your device and add it to your favorites so you can use it easily.
- Sign into the Senza Console.
- Click on the Devices link in the sidebar.
- Find the device with your name in the list and click on it.
- Make a note of your device ID. We'll use it elsewhere.
- Click on "Add to Favorites" at the top of the page.
- Click on "Home" in the sidebar. You'll see your device at the top of the My Favorites list.
Debugger
The Remote Debugger can also be used to debug apps that you are viewing on a cloud connector.
- Make sure that your device is on and currently displaying a web app (not playing a video full screen).
- Click on the "Debug" link next to your device in the Favorite Devices list on the home page of the console.
Follow the same steps as when you tried the debugger with the simulator.
Sample app
At the top of the window, you'll notice that there are now two toolbars! The first is for your local Chrome, and the smaller one right below it is for the remote Chrome. The back, forward, and reload buttons and the address field let you control the remote browser.
- Try entering
https://senzadev.net/banner/into the address field. You'll see that app load on the screen. - Try interacting with the app using the remote control, as you did previously in the simulator.
Testing Workflow
Here are some steps you can take to run an app on your computer and test it on Senza.
Ngrok
Senza needs to load your app from a publicly accessible URL, so you can't test directly from localhost. Fortunately there's a service called ngrok that lets you create a tunnel from the public internet to your computer, so you can test an app from your local development environment.
-
Follow the instructions on using Ngrok to install it.
-
You'll want to get the paid version, which works best with Senza.
-
In a terminal, type
ngrok http 80, substituting the port used by your local web server. -
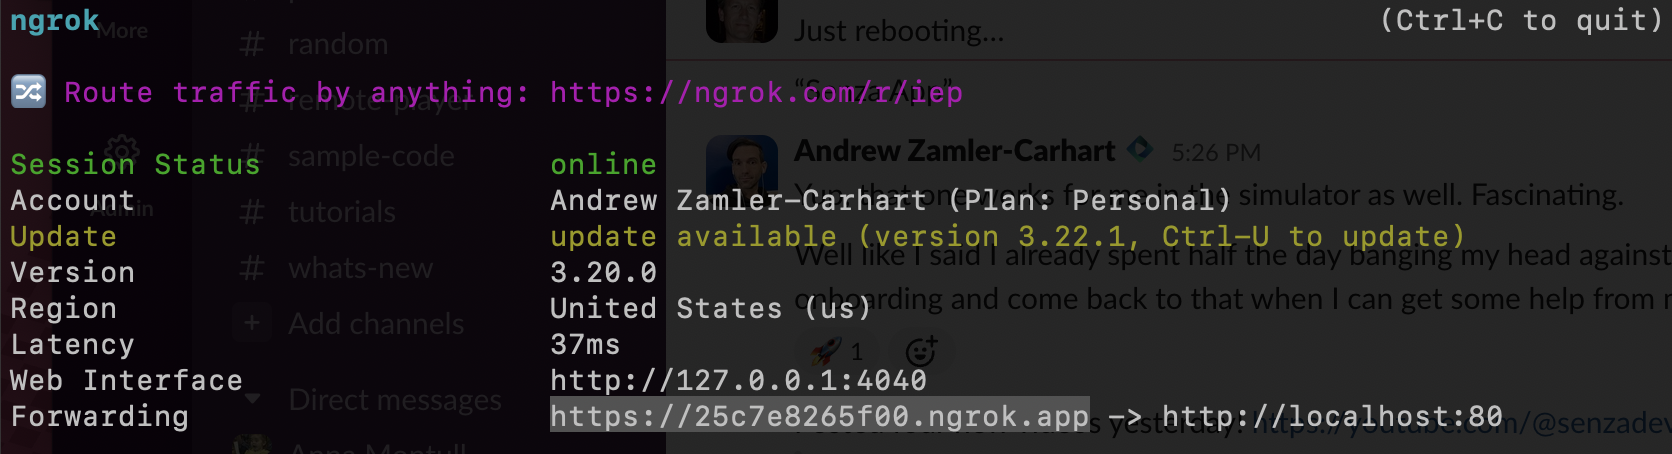
Copy the URL and paste it in a browser, appending the path to your web app. You should see your site.
-
Now try it on your phone! As you can see, it's loading your web app on the public internet.
-
Now try it on Senza, in the simulator or the debugger. Congrats, you're loading your app from your computer!
Make a change
As part of your development workflow, you'll want to make changes and test them out.
- Try making a visible change to your website, like changing some text or the appearance.
- Reload the app:
- In the simulator, click "Disconnect" and then "Connect" again.
- In the debugger, click the "Reload" button in the toolbar (the small one, not the big one).
- If you don't see your change immediately, that's probably because the browser has cached your website.
- Restart
ngrokby hitting Control-C, and then run thengrokcommand again to make a new tunnel. - Copy and paste the new
ngroklink, and you'll see your changes because the browser hasn't cached anything from that link.
That's a bit repetitive, so read on to learn how we can improve on that...
Device Gateway
We'll use a gateway that routes traffic from each Senza device to a custom URL. The gateway has a REST API that can be used to update the URL for each device, and integrates with ngrok to streamline your testing workflow.
- Clone the gateway repo and change to the directory:
-
git clone [email protected]:synamedia-senza/gateway.git cd gateway - Make sure
ngrokis running! - Run the script like this, including your device ID, your name, and the path to your app:
-
node ngrok.js 7e6d37370e21af04 "Your Name" /your-app - The script will restart
ngrokand call the API to set the new link for your device. -
Your Name (7e6d37370e21af04): https://c04346b3d8d0.ngrok.app/your-app => http://localhost:80/your-app - This confirms that device
7e6d37370e21af04will connect to https://c04346b3d8d0.ngrok.app/your-app, which will tunnel to http://localhost:80/your-app on your computer. - Using the device whose ID you entered, press the "Home" button on the remote. It should load your app!
See the Device Gateway tutorial and the Device Gateway video tutorial for more information about how the gateway works.
Updated 6 months ago