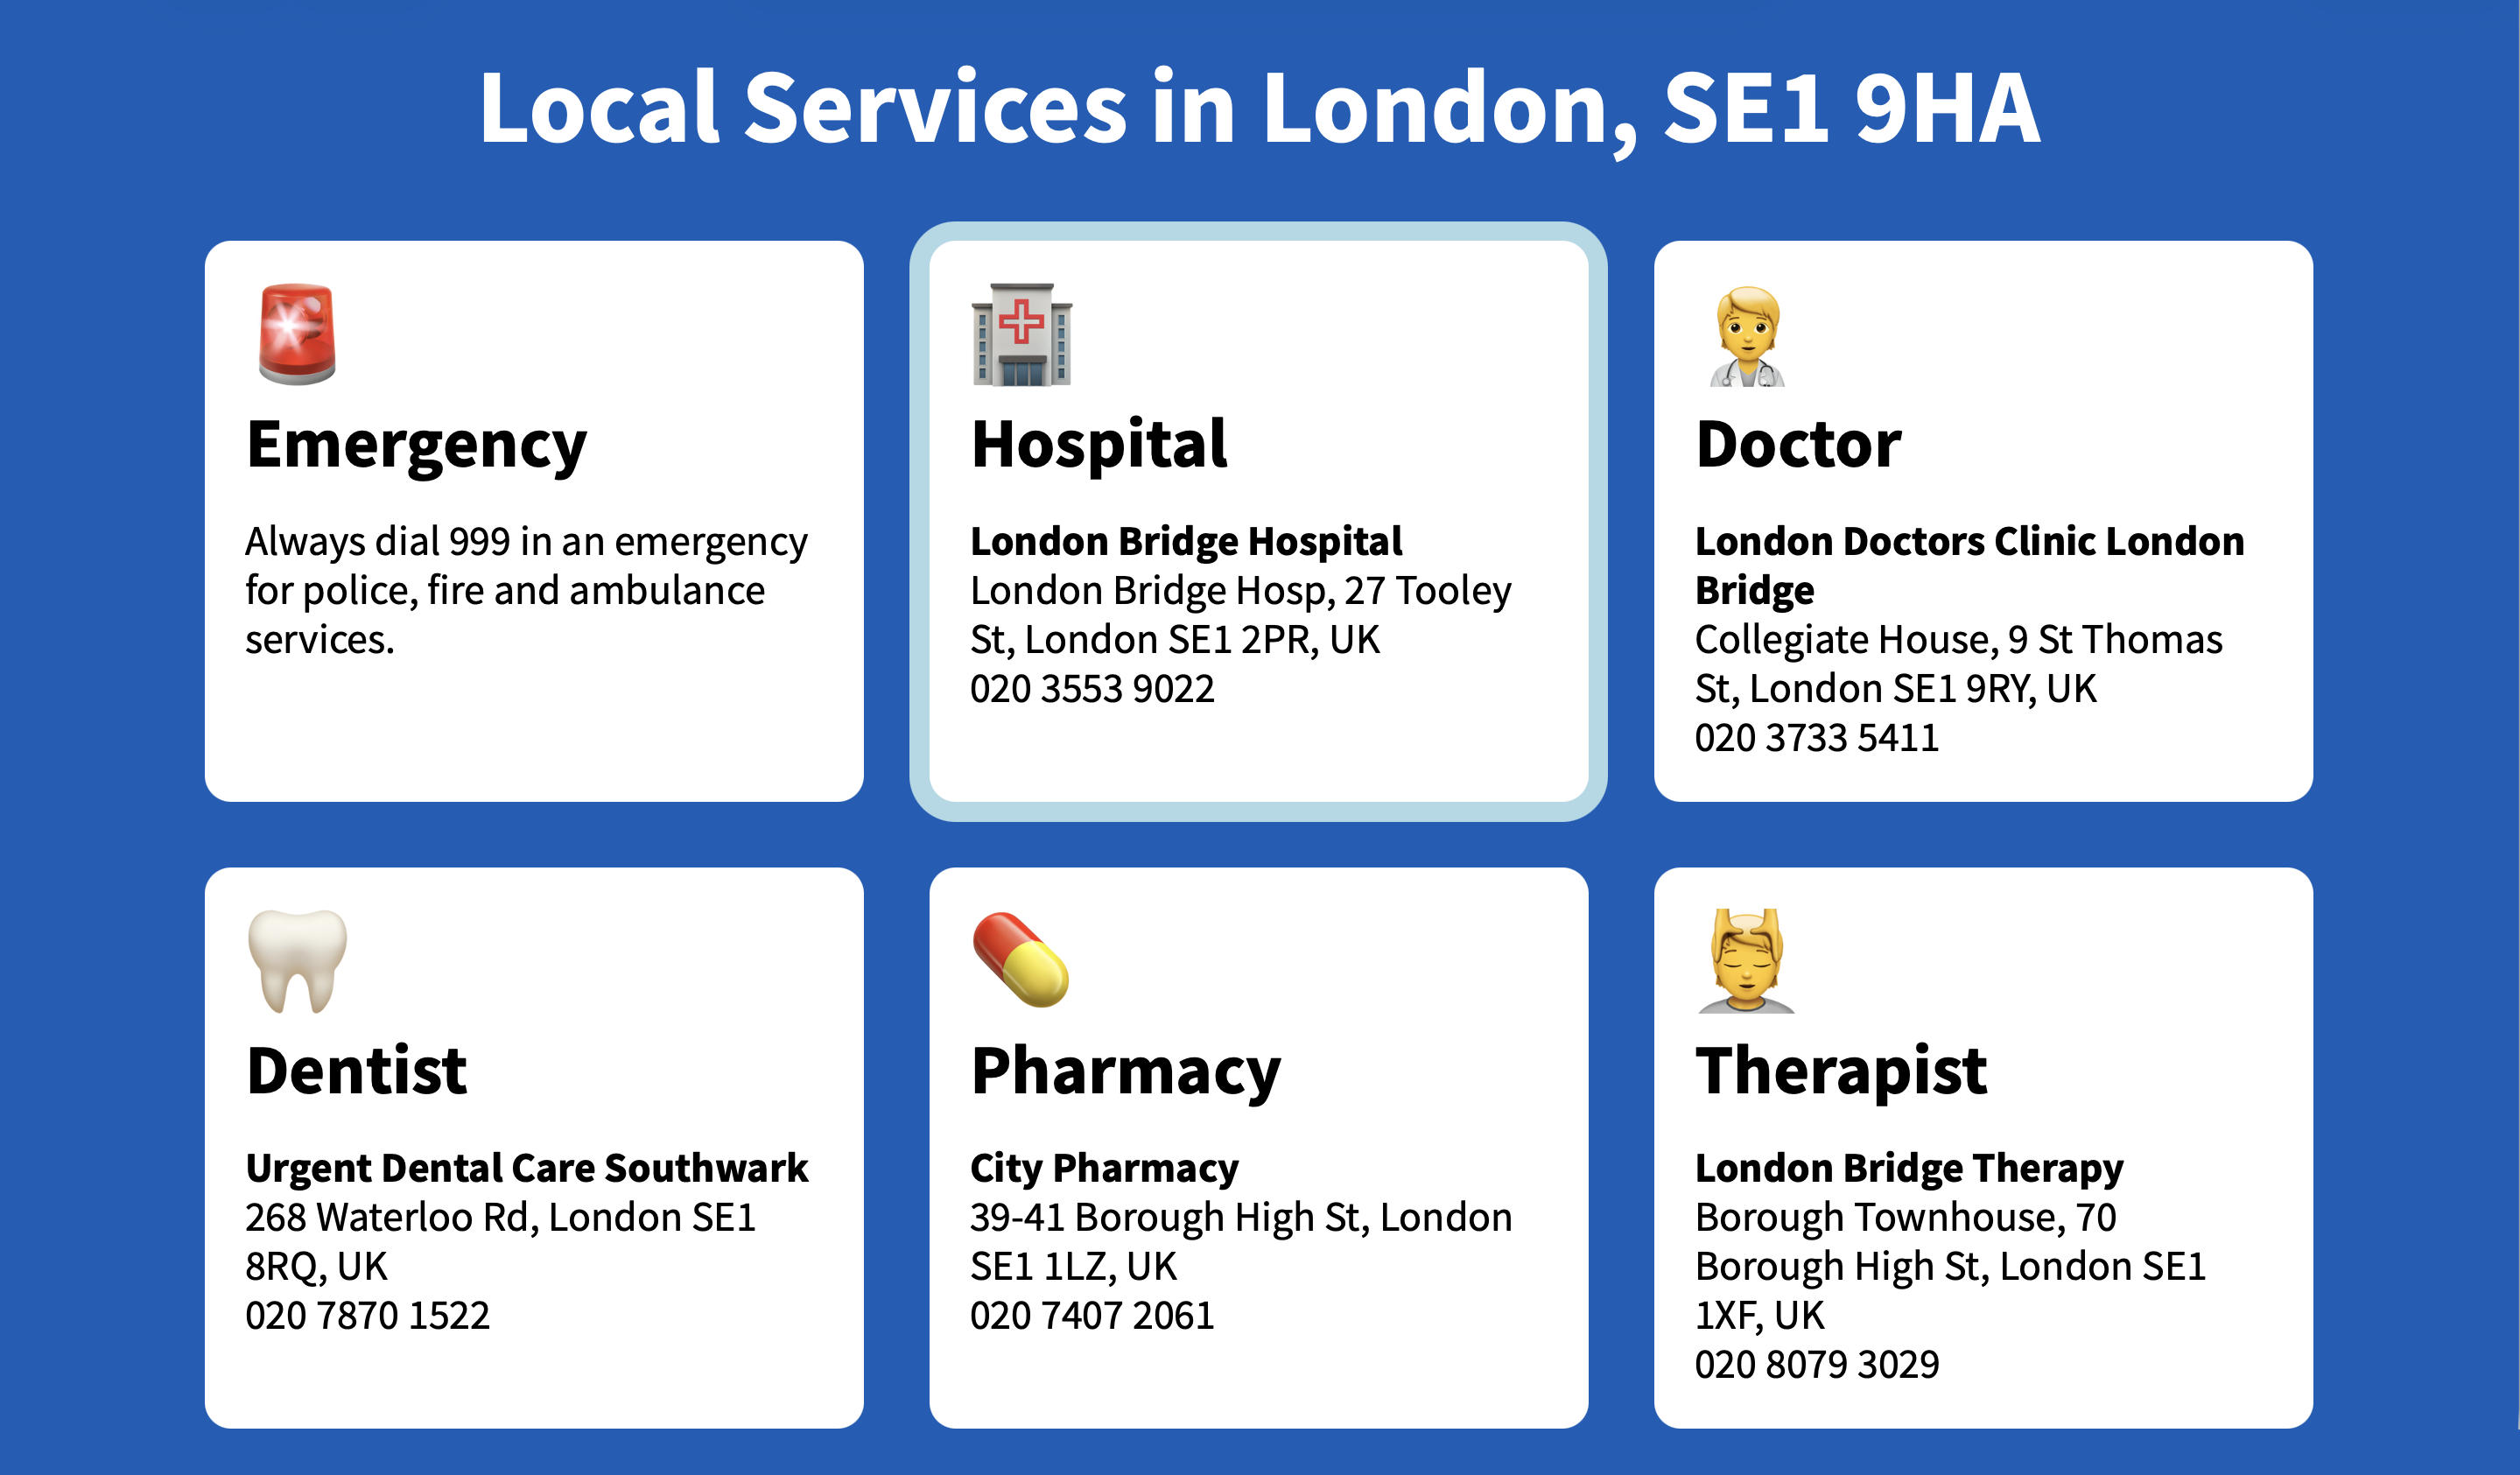
Local Services
The app displays a list of neighborhood services in a grid, including healthcare, social services, places of worship and utilities. If you select a place it will show it on a map.
- Source code: https://github.com/synamedia-senza/local-services
- Demo: https://senzadev.net/local-services/
Video Tutorial
(coming soon)
Grid system
The app uses a grid for navigation, with code for using the arrow keys to move the selection around cells in a table borrowed from the tic-tac-toe sample app. This navigation pattern is highly reusable, so you can copy this code verbatim into your app.
The app uses a simple HTML table. The selX and selY variables keep track of which cell is selected, and the selected class is applied to that cell which in this case draws a border around it. When the user presses an arrow button the app deselects the current cell, increments or decrements the appropriate coordinate, and selects the new cell. Pressing OK navigates to the link for that cell, and pressing back literally just goes back.
let selX = 0;
let selY = 0;

document.addEventListener("keydown", function(event) {
  if (event.key === "ArrowUp") {
    up();
  } else if (event.key === "ArrowDown") {
    down();
  } else if (event.key === "ArrowLeft") {
    left();
  } else if (event.key === "ArrowRight") {
    right();
  } else if (event.key === "Enter") {
    action();
  } else if (event.key === "Escape") {
      history.back();
  } else {
    return;
  }
  event.preventDefault();
});

function up() {
	deselect();
	selY = (selY - 1 + height) % height;
	select();
}

function down() {
	deselect();
	selY = (selY + 1) % height;
	select();
}

function left() {
	deselect();
	selX = (selX - 1 + width) % width;
	select();
}

function right() {
	deselect();
	selX = (selX + 1) % width;
	select();
}

function action() {
  let cell = selectedCell();
  if (cell.href) {
    window.location = cell.href;
  }
}

function select() {
  let cell = selectedCell();
	cell.classList.add("selected");
  cell.scrollIntoView({behavior: 'auto', block: 'center', inline: 'center'});
}

function deselect() {
	selectedCell().classList.remove("selected");
}
Geolocation
Just like in the Geolocation tutorial, this app use ipdata.co to geolocate the IP address of the device. Because the browser is running in the cloud, we make a one line call to the Device Manager to get the IP address. If we're not running on Senza, the service itself will get the computer's IP address from the request so we don't need to send it.
async function getLocation() {
  await senza.init();
  let ipAddress = senza.isRunningE2E() ? senza.deviceManager.deviceInfo.clientIp : "";
  ipData = await (await fetch(`https://api.ipdata.co/${ipAddress}?api-key=${ipDataAPIKey}`)).json();

  // add postcode precision for known cities
  const postcodes = {"London": "SE1 9HA", "Brooklyn": "11211"};
  ipData.postcode = postcodes[ipData.city];

  displayLocation = ipData.postcode ? `${ipData.city}, ${ipData.postcode}` : ipData.city;
  searchLocation = `${displayLocation}, ${ipData.region}, ${ipData.country_name}`;
  header.textContent = `Local Services in ${displayLocation}`;
}
This service returns the current city, region and country, but it isn't able to geolocate the device to a precise location like a specific block. For demo purposes we've defined some specific postcodes to use for certain cities.
Here we display the city (and postcode if known) in the page header, and calculate a query string with the city, region and country that we'll use for searches.
Creating the table
First we define a content array like this:
const content = [
{"emoji": "🚨", "name": "Emergency", "content": "Always dial 999 in an emergency for police, fire and ambulance services."},
{"emoji": "🏥", "name": "Hospital"},
{"emoji": "🧑⚕️", "name": "Doctor"},
{"emoji": "🦷", "name": "Dentist"},
{"emoji": "💊", "name": "Pharmacy"},
{"emoji": "💆", "name": "Therapist"},
{"emoji": "💁", "name": "Social Services"},
{"emoji": "🍽️", "name": "Food Assistance"},
{"emoji": "🧓", "name": "Senior Center"},
{"emoji": "⛪️", "name": "Church"},
{"emoji": "🕍", "name": "Synagogue"},
{"emoji": "🕌", "name": "Mosque"},
{"emoji": "🔌", "name": "Electric Utility"},
{"emoji": "🚰", "name": "Water Utility"},
{"emoji": "⛽️", "name": "Gas Utility"}
];Then we call a function that populates the table using the list of items. It splits the array into chunks of three items, one chunk per row. Then we create a cell for each item with the emoji and name.
function createTable(items) {
  let groups = chunkArray(items, width);
  height = groups.length;

	let table = document.getElementById("grid");
  for (let group of groups) {
		let row = table.insertRow();
    for (let item of group) {
			let cell = row.insertCell();
			cell.classList.add("cell");

      if (item.emoji) cell.appendChild(makeElement("div", "emoji", item.emoji));
      cell.appendChild(makeElement("div", "name", checkSpelling(item.name)));

      let content = makeElement("div", "content", item.content || "");
      cell.appendChild(content);
      if (item.name == "Emergency") {
        content.textContent = updateEmergencyNumber(item.content);
      } else {
        findService(item, cell, content);
      }
		}
	}
  select();
}

function makeElement(type, className, content) {
  let element = document.createElement(type);
  element.className = className;
  element.innerHTML = content;
  return element;
}
For the first cell, we'll just display the emergency number. We'll revise it depending upon the location as follows:
- 999: best for UK
- 911: best for Americas
- 112: best for European Union
function updateEmergencyNumber(content) {
  if (ipData.longitude < -25) { // Americas
    return content.replace("999", "911");
  } else if (ipData.is_eu) { // European Union
    return content.replace("999", "112");
  } else {
    return content;
  }
}
Finding places
We'll use the Google Places API to look for nearby places. As we are building the table, we'll call the findServices() function. It's an async function, so if we call it several times in a loop without using await it will run all the searches in a parallel and update the page quickly.
Our query is basically just <place> near <location>, with the name of the type of place and the location information that we gathered above. The searchPlaces() function just takes a query and a max result count and returns an array of places. We'll call it with a limit of 1, and then just use the first and only result.
We'll update the content of the cell with the display name, formatted address and national phone number of the place. When the user selects a cell and presses the OK button, we'll go to the map.html page with the place's ID in the query parameters.
async function findService(item, cell, content) {
  let query = `${item.name} near ${searchLocation}`;
  let places = await searchPlaces(query, 1);
  if (places.length) {
    let place = places[0];
    content.innerHTML = `<b>${cleanTitle(place.displayName)}</b>` +
      `<br>${place.formattedAddress}<br>${place.nationalPhoneNumber || ""}`;
    cell.href = `map.html?id=${place.id}`;
  }
}

async function searchPlaces(textQuery, maxResultCount = 6) {
  const request = {textQuery, maxResultCount, language: 'en-US',
    fields: ['displayName', 'location', 'formattedAddress', 'nationalPhoneNumber']};
  let { places } = await Place.searchByText(request);
  return places;
}
Map page
The map.html page just displays a Google Map full screen with the selected place highlighted. It's pretty standard Google Maps boilerplate, so you can check the source code if you want to see all the details. The only customizations are that we get the place ID from the query params with get("id"), and that we apply a transform: scale(2); to the map element too zoom in for better legibility from across the room.

Conclusion
In this simple demo, you've learned how to geolocate the device, search for nearby places, and display them on a map!
Updated 2 months ago