Making your website remote control friendly
Websites were originally designed for point-and-click user interaction, and many have been adapted for a multi-touch interface. Senza is a video streaming platform that is primarily designed for interacting with content on a television using a remote control. What does it take to adapt an existing website to support this interaction mode? Turns out it's easier than you might think!
Interaction with an app running on a television typically uses six buttons: four directional buttons to move up/down/left/right, an enter button, and a back button. Rather than clicking with the mouse or tapping with your finger, you typically use the arrow keys to move the focus on the screen until what you want is selected, and then use the enter key to perform an action.
There are several ways to move the selection focus:
- The content stays fixed to the background, and the focus moves around the screen.
- The selection is pegged to the middle of the screen, and the content slides around as you move the focus.
We'll explore both modes in this article!
How do you indicate focus on an element? We'll use the power of cascading style sheets (CSS) to make this easy. By simply defining a class called selected and changing which element is added to that class, you can use pretty much any design technique to highlight the selected element: changing the font, color, style, size, shadow, anything you like.
For the remainder of this article, we'll focus on two techniques: making links selectable, and moving around a grid. You can get started with these techniques right away using the web browser on your computer. Put your mouse or trackpad away, and you'll be able to test everything using the arrow keys, return key, and escape key on your keyboard.
Making links selectable
For this use case, we'll take an existing website filled with links and make it navigable using remote control based input. The website we'll use is https://andrewzc.net, which consists primarily of plain HTML pages each with a series of links. We want to introduce the concept of focus so we can select the links, use the up/down keys to move between links on a page, use the enter key to follow links, and the back key to return to the previous page.
All of this can be implemented by loading a short script on each page... and the whole update took only about half an hour to write! We'll build up the script one piece at a time.
Listen for keystrokes
We'll start by adding an event listener that responds to keystrokes. Our remote control is basically a keyboard with six keys, so we'll use a switch statement to map each one to a matching function that we'll implement. If an event is received for any other key we'll just ignore it by returning. But if we do handle it, we'll call event.preventDefault(), which prevents the browser on your computer from doing what it would normally do when you hit those keys, such as scrolling the page.
document.addEventListener("keydown", function(event) {
    switch (event.key) {
        case "ArrowUp": up(); break;
        case "ArrowDown": down(); break;
        case "ArrowLeft": left(); break;
        case "ArrowRight": right(); break;
        case "Enter": enter(); break;
        case "Escape": escape(); break;
        default: return;
    }
    event.preventDefault();
});
Find the links
We want to find all the elements on the page that we want to be able to select. In this case we'll simply get all of the hyperlinks, but you could also get all elements in a particular class. They don't have to be limited to hyperlinks, you could select divs, spans, images, anything.
// gets all text links on the page
// don't cache the result, call this function each time you need it
function getLinks() {
  return Array.from(document.getElementsByTagName("a")).filter(isText);
}
// returns whether the link starts with a letter or number
function isText(link) {
  if (link.innerHTML.length == 0) return false;
  return /^[a-zA-Z0-9]+$/.test(link.innerHTML[0]);
}
Note that getElementsByTagName() or getElementsByClassName() return an HTMLCollection object, so we convert that to an array so we can do array type things with it. In this case, we filter the links for ones that start with a letter or a number.
Be careful not to cache the result of this call in a global variable, as the objects in the array may become disconnected from the displayed elements on the page. Better to call the function each time you need access to the elements when processing an event.
Moving around
Next we'll add some handlers to let you use the up and down arrow keys to move the selection. We'll define a global variable to store the index of the selected item, which we'll initialize to -1 to indicate no selection. The up() and down() functions are structured the same way, and decrement or increment the selection by one. Note the direction, the index increases as you go down the page. Also note how we use the modulo operator to support wrapping around in both directions.
let selected = -1;

function up() {
  let links = getLinks();
    if (links.length > 0) {
      if (selected != -1) deselect(links[selected]);
      selected = (selected - 1 + links.length) % links.length;
      select(links[selected]);
    }
 }
function down() {
  let links = getLinks();
    if (links.length > 0) {
      if (selected != -1) deselect(links[selected]);
      selected = (selected + 1) % links.length;
      select(links[selected]);
    }
}
The general idea is to deselect the currently selected element, modify the index, and then select the new element. Selecting is as simple as adding a class, while deselecting is the opposite, we just remove that class. Super easy!f
function select(link) {
  link.classList.add("selected");
  scrollToMiddle(link);
  console.log('Selected: ' + link.innerHTML);
}

function deselect(link) {
  link.classList.remove("selected");
}

function scrollToMiddle(link) {
  link.scrollIntoView({behavior: 'auto', block: 'center', inline: 'center'});
}
When selecting a link, we'll scroll the page so that the selected link stays in the middle of the screen. Once you've navigated halfway down the first screenful of content, this gives the effect of the focus staying in the same place and the content sliding around underneath, just like on a set-top box.
.selected {
    color: #43C6DB;
}
As previously mentioned, you can use any kind of CSS style to implement your selected class. Here we simply change the color of the link. Be careful to define this class after the normal definition of your element's class so that it has precedence!
Following links
To follow a link, we just set the window location to the reference of the selected link. You can use either the enter key or the right arrow.
function enter() {
  if (selected != -1) {
    let links = getLinks();
    window.location = links[selected].href;
  }
}

function right() {
  enter();
}
To return to the previous page, just hit the escape key or left arrow.
function escape() {
  history.back();
}

function left() {
  escape();
}
One more thing... typeahead
Here's an extra bonus that won't work on your TV, but will still make a cool addition to your site. What if you could select links by typing a few letters at the beginning of the name, just the same way you can select files in the Finder?
First, replace the switch statement in the event handler with if statements, and add one to catch all letter keys:
if (event.key >= 'a' && event.key <= 'z') {
  letter(event.key);
}
Define a string to hold the typeahead buffer, and when the user starts typing a word append the keystrokes together. We'll want to clear out that buffer after two seconds so that if they start typing something else we can go to that instead.
let typeahead = '';
function letter(key) {
  typeahead += key;
  selectLinkByName(typeahead);
  window.setTimeout(() => typeahead = '', 2000);
}

function selectLinkByName(text) {
  let links = getLinks();
  for (let i = 0; i < links.length; i++) {
    let link = links[i];
    if (link.innerHTML.toLowerCase().startsWith(text)) {
      if (selected != -1) deselect(links[selected]);
      selected = i;
      select(links[selected]);
      return;
    }
  }
}
After each keystroke has been appended to the buffer, we'll just iterate through the list of links and select the first one whose name starts with that string. If you want to navigate to one link on the page on your computer, this makes it super fast.
Conclusion
Here's how it looks! The link in the middle stays aqua colored, and the rest of the page moves around as the focus changes.
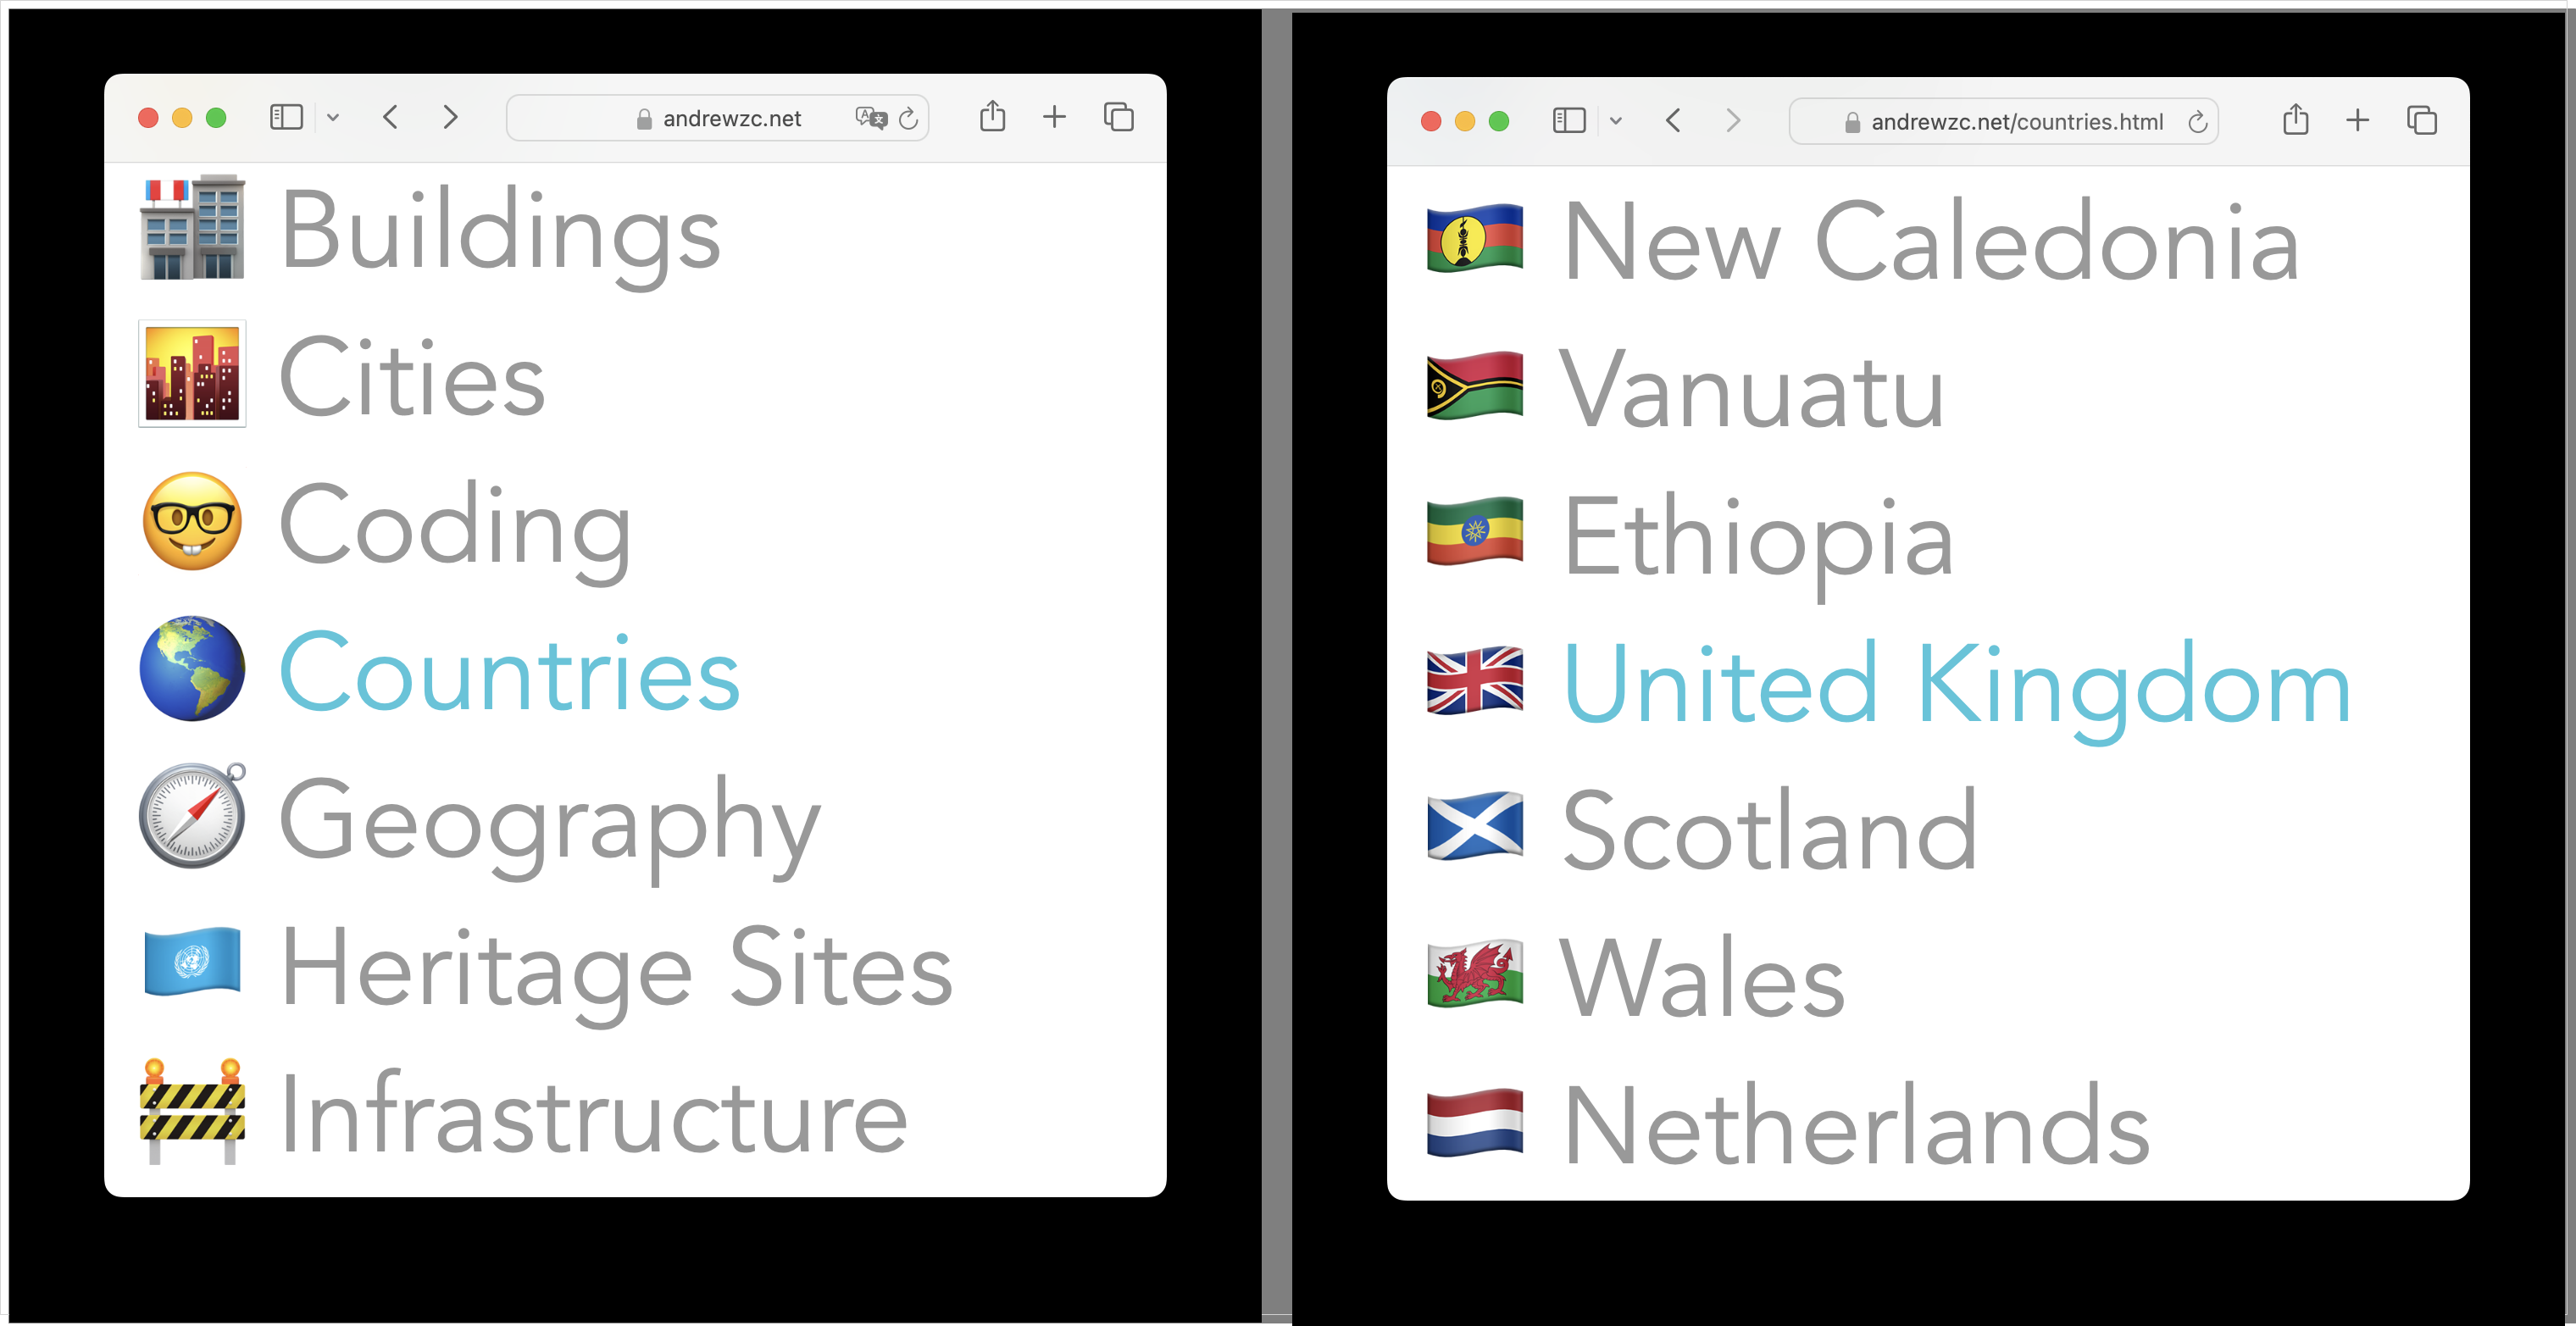
These screenshots were taken on a computer. Everything works just as well on a Senza device, but sadly our Chromium browser running on Linux is completely lacking in emoji support so it won't look as pretty (potential fix).
These are just examples of how to support navigation on a traditional HTML based website. For a single-page app implemented in React or your framework of choice, you can simply adapt the keys to suit the navigation flows inside your app.
Moving around a grid
Let's adapt this technique and mix it up a bit. This time we'll use the arrow keys to navigate around a two-dimensional grid. Instead of the focus staying centered and the content moving, we'll keep the content in place and move the focus around. For this exercise we'll build a simple implementation of Tic Tac Toe, everyone's favorite 3x3 grid based game.
The Board
We'll start with a little code to build the board. The body of the page contains a nested table. We'll build the actual cells programmatically.
<table id="main">
	<tr>
		<td>
			<table id="game">
			</table>
		</td>
	</tr>
</table>
Define some constants for the size of the board, and use some loops to create the rows and cells.
const width = 3;
const height = 3;

function createTable() {
	let table = document.getElementById("game");
	for (let i = 0; i < height; i++) {
		let row = table.insertRow(0);
		for (let j = 0; j < width; j++) {
			let cell = row.insertCell(0);
			cell.classList.add("cell");
		}
	}
}
createTable();
Define some global variables to store the game state. We'll store the x and y coordinates of the selected cell, and define booleans to store whether it's X's turn and whether the game is over.
let x = 1;
let y = 1;
let turn = true;
let over = false;
And here are some functions to get all the cells, or just the selected cells.
function allCells() {
	return Array.from(document.getElementsByClassName("cell"));
}

function selectedCell() {
	return allCells()[y * width + x];
}
As you can see, we're using a simple data structure with all the cells in a one-dimensional array. To find the selected cell in the grid, we index into the array using the grid coordinates in the expression y * width + x.
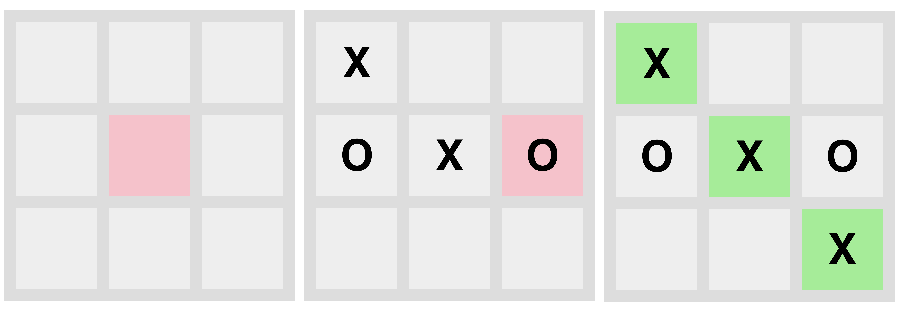
Moving Around
We'll use the same event listener as in the first example. You're getting the hang of it by now!
document.addEventListener("keydown", function(event) {
	switch (event.key) {
		case "ArrowUp": up(); break;
		case "ArrowDown": down(); break;
		case "ArrowLeft": left(); break;
		case "ArrowRight": right(); break;
		case "Enter": mark(); break;
		case "Escape": clear(); break;
		default: return;
	}
	event.preventDefault();
});
We'll handle arrow key presses just like before, incrementing or decrementing the coordinates as needed. We manage the selection by first deselecting, adjusting the coordinates, and finally selecting again. Again we use the modulo operator to support wrapping around in any direction.
function up() {
	deselect();
	y = (y - 1 + height) % height;
	select();
}

function down() {
	deselect();
	y = (y + 1) % height;
	select();
}

function left() {
	deselect();
	x = (x - 1 + width) % width;
	select();
}

function right() {
	deselect();
	x = (x + 1) % width;
	select();
}
Selecting or deselecting a cell again is as simple as adding or removing a class:
function select() {
	selectedCell().classList.add("selected");
}

function deselect() {
	selectedCell().classList.remove("selected");
}
Playing the Game
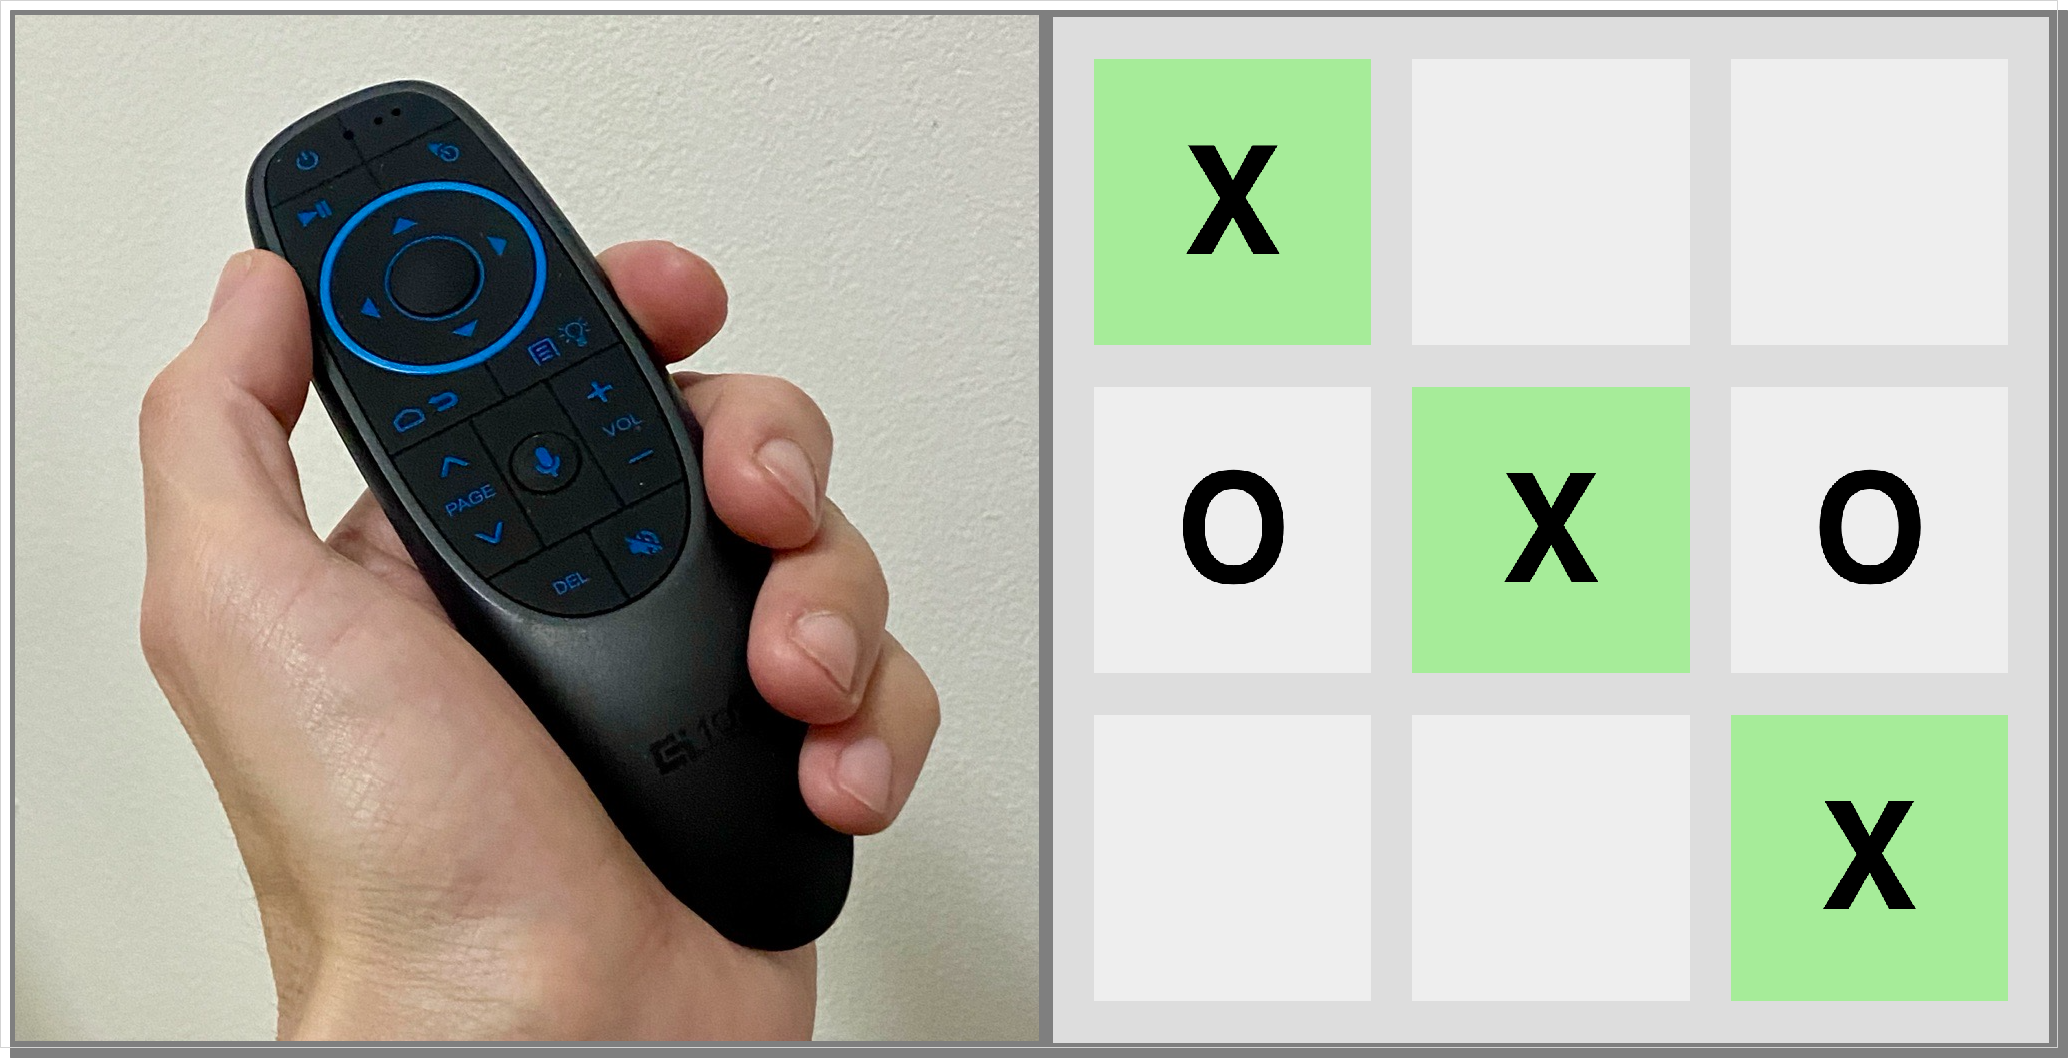
The players take turns with the remote, use the arrow keys to select a cell, and then hit enter to make a move. We check that nobody has already marked the current cell and that the game isn't over, and then put an X or an O in the cell. Then we switch whose turn it is.
function mark()	{
	let cell = selectedCell();
	if (cell.innerHTML == '' && !over) {
		cell.innerHTML = turn ? 'X' : 'O';
		turn = !turn;
		check();
	}
}
Each time someone makes a move, we check if they have won. There are eight possible ways to get three in a row: three rows, three columns, and two diagonals. Here we iterate through each of those groups of three cells, checking if the values are non-empty and identical. If so, we change the class on the winning cells and set a flag to indicate that the game is over.
function check() {
	let cells = allCells();
	let lines = [
		[cells[0],cells[1],cells[2]],
		[cells[3],cells[4],cells[5]],
		[cells[6],cells[7],cells[8]],
		[cells[0],cells[3],cells[6]],
		[cells[1],cells[4],cells[7]],
		[cells[2],cells[5],cells[8]],
		[cells[0],cells[4],cells[8]],
		[cells[2],cells[4],cells[6]]
	];

	lines.forEach((line) => {
		if (line[0].innerHTML != '' &&
			line[0].innerHTML == line[1].innerHTML &&
			line[1].innerHTML == line[2].innerHTML)
		{
			line.forEach((cell) => cell.classList.add("won"));
			over = true;
		}
	});
}
As you can see, the game uses the table itself for the data model; there is no separate data structure. If you wanted to get all fancy you could use React to bind the view to a separate model, allow network play, build a computer player algorithm, etc... But we'll leave it here for now!
Clearing the board
After either player has won, the arrow keys no longer have effect and the only thing you can do is hit the escape key to clear the board.
function clear() {
	deselect();
	x = 1;
	y = 1;
	turn = true;
	over = false;
	allCells().forEach((cell) => {
		cell.innerHTML = '';
		cell.classList.remove("won");
	});
	select();
}
clear();
Note that we also call the clear() function when we first load the page to make sure that everything is properly initialized and the middle cell is selected.
Styling
Here's some styling to make the table display properly. We are assuming that we're running in 1080p and set the height accordingly.
body {
	margin: 0px;
	background-color: black;
}

#main {
	width: 100%;
	height: 1080px;
}

#game {
	margin-left: auto;
	margin-right: auto;
	border-spacing: 30px;
	background-color: #DDD;
}

td {
	text-align: center;
	vertical-align: middle;
}

.cell {
	width: 200px;
	height: 200px;
	background-color: #EEE;
	font: 80pt Helvetica;
	font-weight: bold;
}

.selected {
	background-color: #FFC0CB;
}

.won {
	background-color: #90ee90;
}
Screenshots
Here's what it looks like when you play the game:
The game works equally well in a browser on your computer, in the simulator, and on a real Senza device.
You can try it out using the URL https://andrewzc.net/tic-tac-toe.html and view the source code on that page.
Conclusion
These are just two very simple examples to show how easy it is to add remote control navigation to a web page. Regardless of the kind of information you're presenting, as long as the information is organized in a one-dimensional or two-dimensional array it should be easy to use the arrow keys to move the focus and the enter key to select the desired content.
Updated about 2 months ago